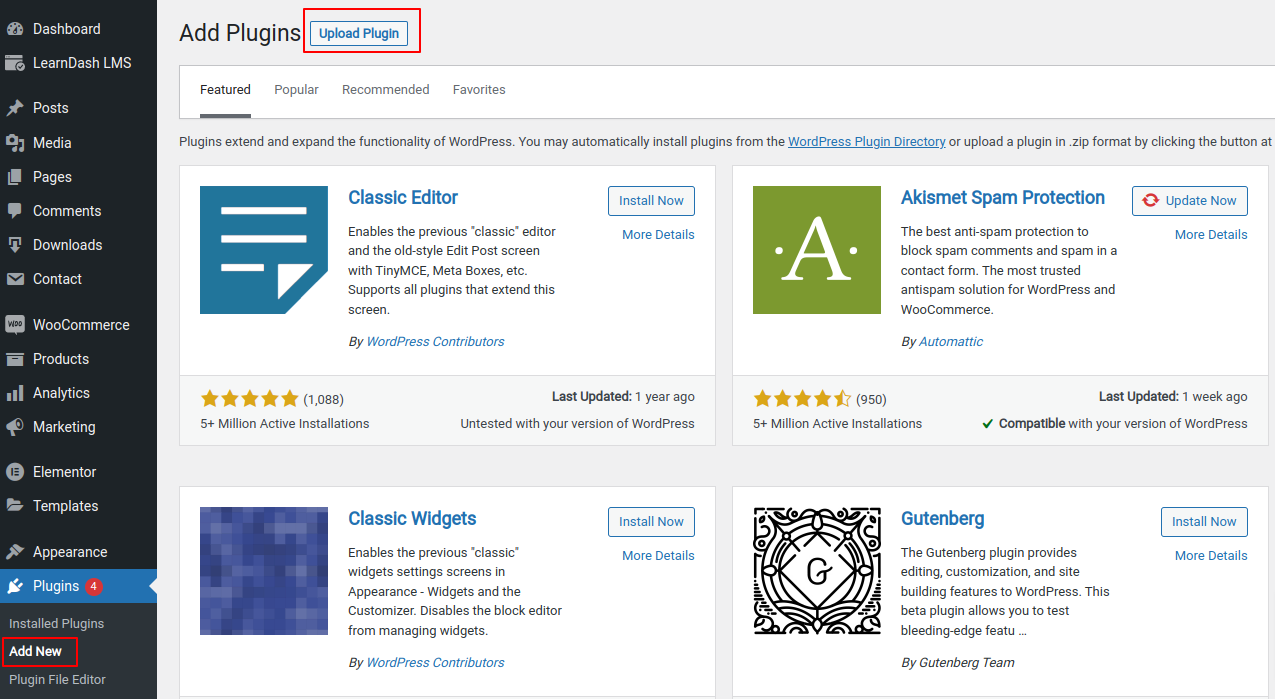
- In WordPress download the Plugin file & navigate to PLUGINS > ADD NEW
- Click Upload Plugin
- Browse for the .zip file you downloaded in Step 1
- Click Install Now
- Click Activate Plugin
Installation Instruction
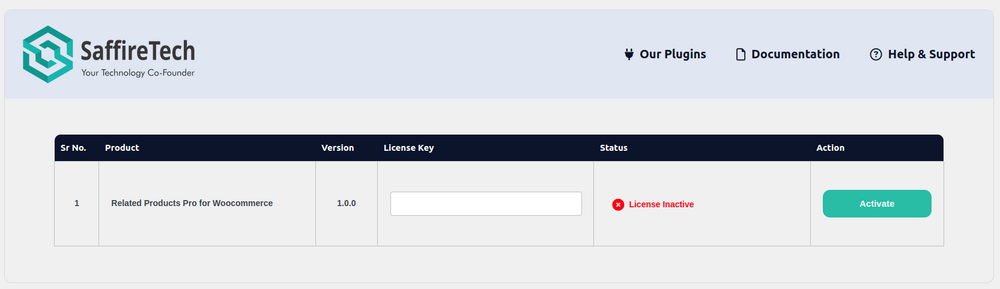
License Activation
- Navigate Plugins > Related Products Pro for WooCommerce License Activation.
- Find your license key in the Purchase Receipt sent to your email or you can retrieve it from, My Account > Purchase History > View Licenses on the SaffireTech website.
- Enter Your license key in the license key field.
- Click Activate License.
- You will find the validity of your license below.
AI Product Suggestions
Before starting, ensure that you must have a premium ChatGPT account to create an API key. Please upgrade your account if you haven’t done so already. Once you’re done please follow the steps below to get AI recommendations
A) ChatGPT API Key setup
To create a ChatGPT API Key from your OpenAI account for our plugin, please follow these steps:
1. Sign Up/ Login: On your web browser, open the official OpenAI website. Here, you’ll need to log into your account. If you don’t have one, sign up using either your email, Google, or Microsoft account.
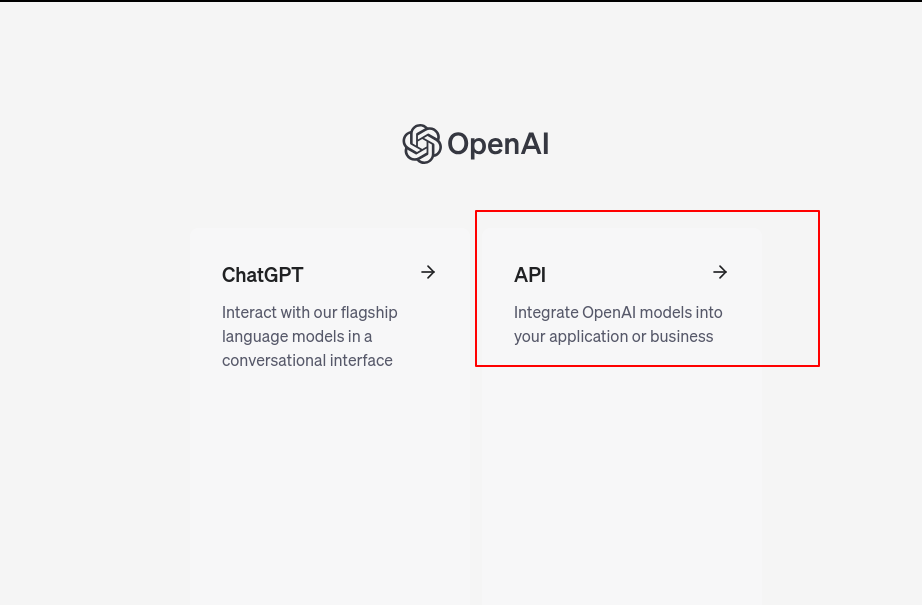
2. Generate API Key: Once you log into your account, you’ll be directed to a dashboard where you’ll see “API Keys” menu on the sidebar. Click it.
On the top right corner of your screen, you’ll notice a “Create new secret key” button. Click on it, enter the Name for your API key, and click Create secret key.
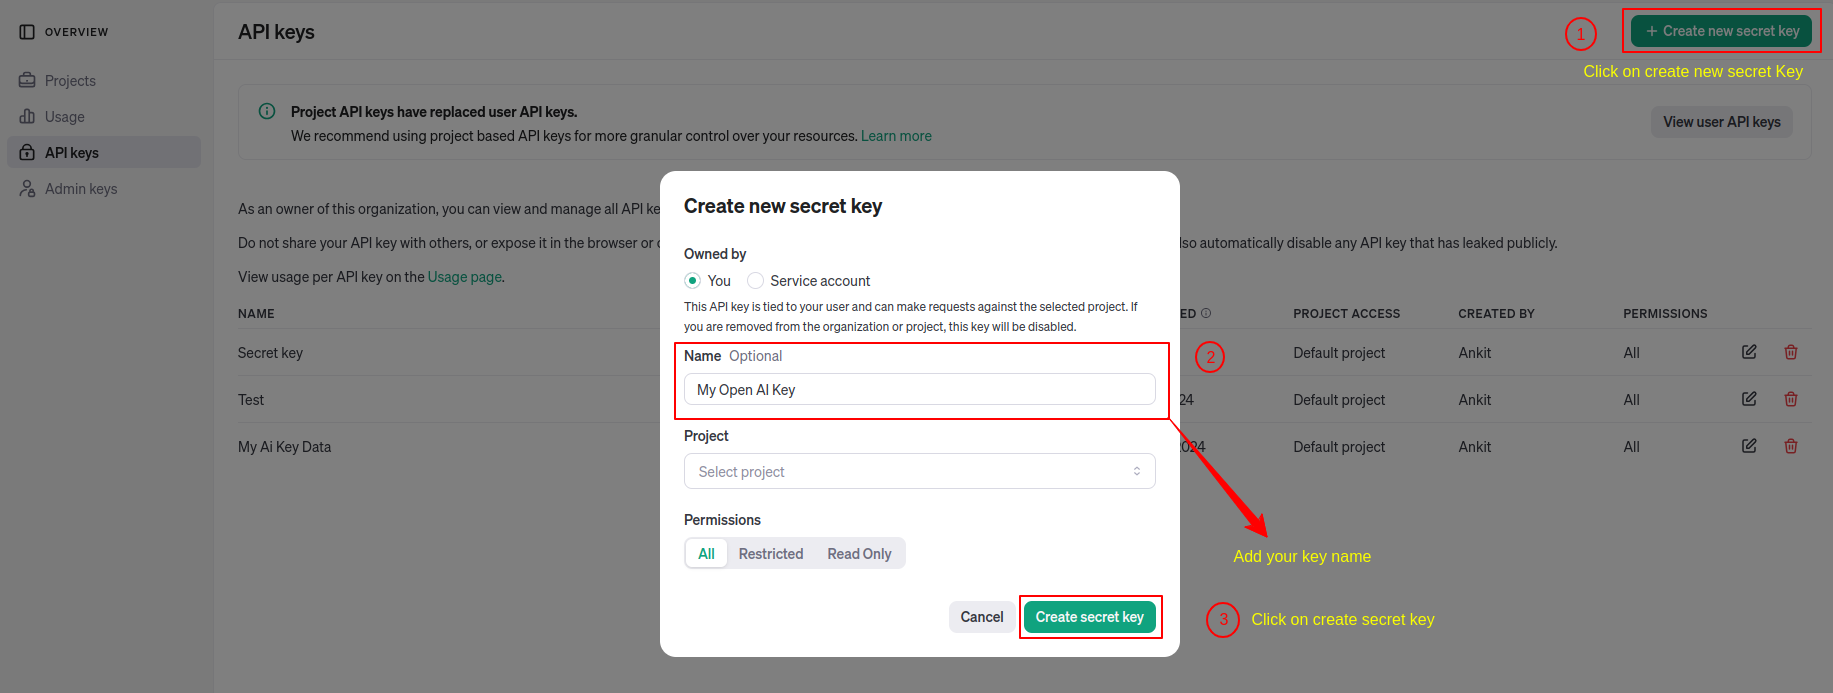
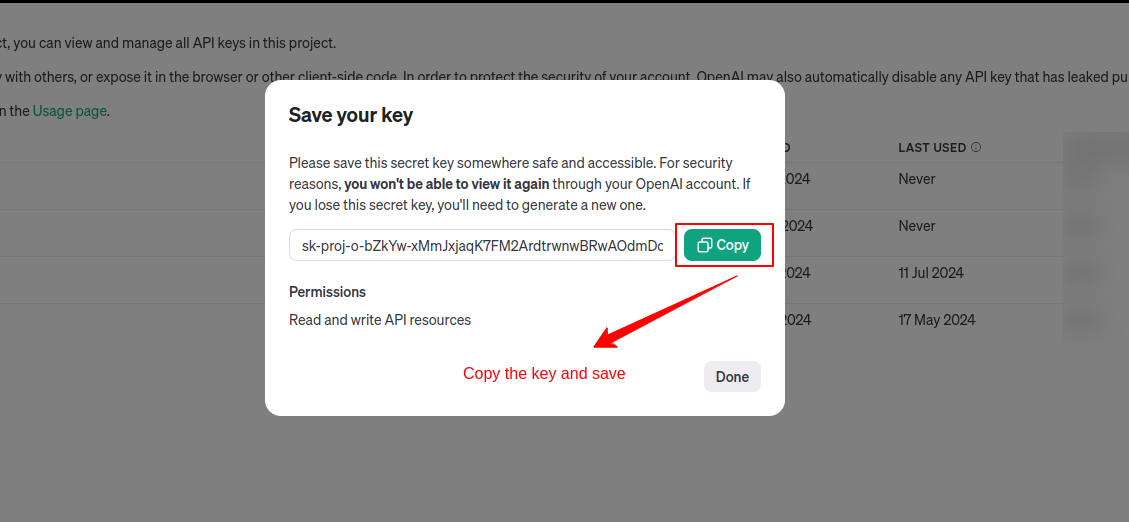
3. Save the API Key: After the previous step, a pop up will be shown highlighting your API Key.
Now the important thing to note is that, if you click on Done, you won’t be able to see your API Key again. What you can do is Copy the API key and save it on your computer to access it again.
B) Validate ChatGPT API key
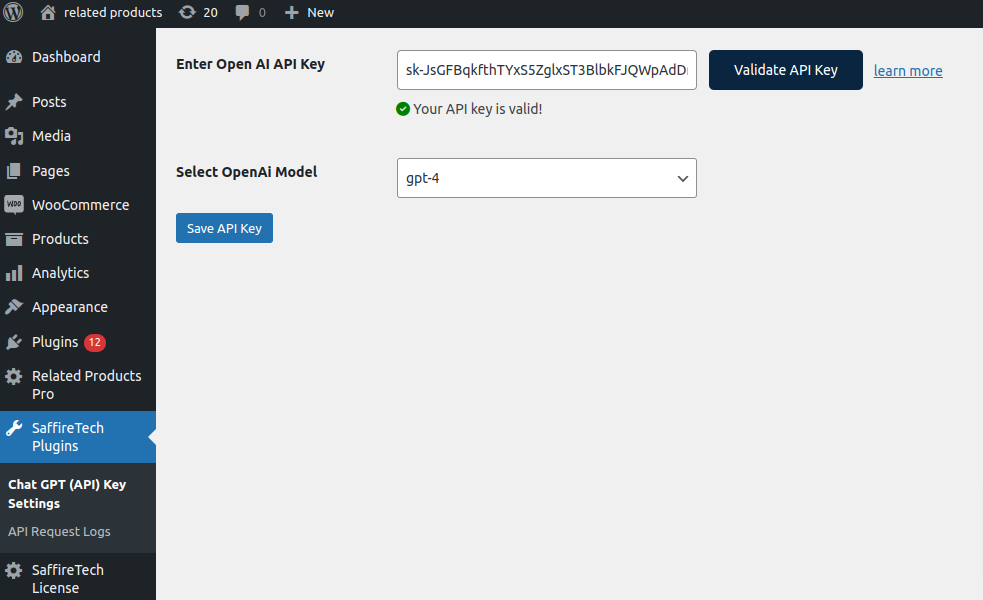
- After installing the Related Products Pro for WooCommerce plugin, on your WordPress dashboard, go to SaffireTech Plugins ->Chat GPT (API) Key Settings. Here you will be asked to enter your Open AI API key and choose its model.
- Enter your API Key that you had saved earlier, and click the “Validate API key” button. It will take a quick second to check the validity of your API Key. You will get a validation message there itself.
- Next, select your desired ChatGPT model. This model will be responsible for processing your requests. Finally, click the “Save Settings” button to save your API Key and selected ChatGPT model.
C) Getting AI Product Recommendations for Related, Upsell, and Cross-Sell
Once you have successfully configured the ChatGPT API Key, we are ready to get product recommendations using AI.
Here, we’ll take the example of a Sports equipment outlet to demonstrate the settings on how to use the AI functionality.
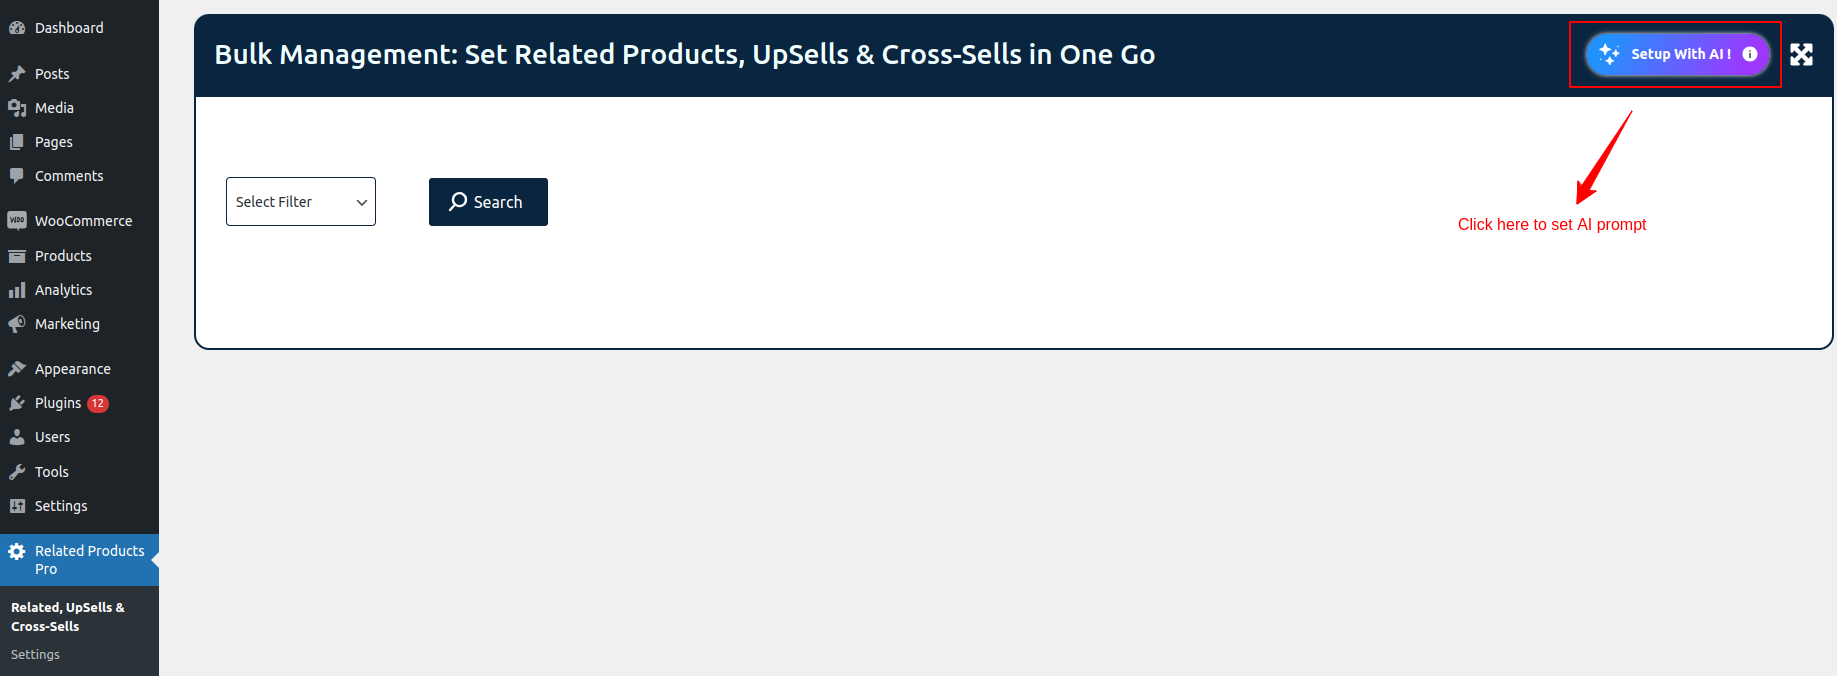
- First Visit Dashboard > Related Products Pro here you will find a button that says ‘Setup With AI’ on the top right corner of the screen. Click on it and a pop-up for initiating the AI Product Recommendation process will be displayed.
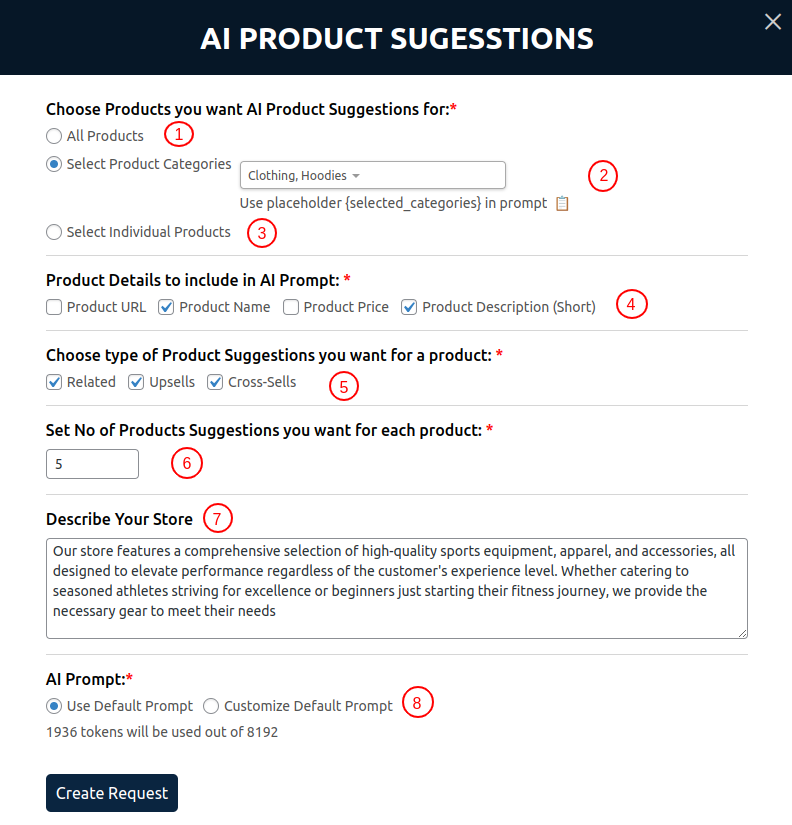
- All Products: This feature allows admins to generate recommendations for all products in the store. By adding the designated {all_products} placeholder in your prompt, the system will automatically include suggestions from the entire product range.
- Select Product Categories: Admins can filter recommendations by specific categories with this option. When selected, only products within the chosen categories will be sent in the recommendations when the {selected_categories} placeholder is used in the prompt.
- Select Individual Products: This feature allows admins to focus recommendations on specific products. When selected, recommendations will be limited to the chosen products whenever the {selected_products} placeholder is included in the prompt.
- Product Details to Include in AI Prompt: Admins can decide which product details such as Name, Price, Short Description, or URL should be included in the prompt. This customization ensures that the recommendations are detailed and relevant.
- Choose type of Product Suggestions you want for a product: This option will allow admins to select the type of suggestions they want for a specific product. They can choose from Related products, Upsells, and Cross-sells. If any of the above-mentioned suggestions are not chosen, then suggestions for that section won’t be shown.
- Set No of Products Suggestions you want for each product: Admins can choose the number of product suggestions they want for every specific product. The count of suggested products will depend on the number they input. Let’s say if the admin enters ‘5’, then 5 products will be suggested in each of the Related, Upsells, and Cross-sells sections.
- Describe Your Store: This option allows admins to incorporate a store description into the prompt. This helps align the recommendations with the store’s brand and product offerings.
- AI Prompt: Admins can choose the type of prompt to send. If set to “Use Default Prompt,” the standard prompt will be sent to ChatGPT. If set to “Customize Default Prompt,” admins can customize the prompt to suit their specific needs.
Related AI Recommendations Logs
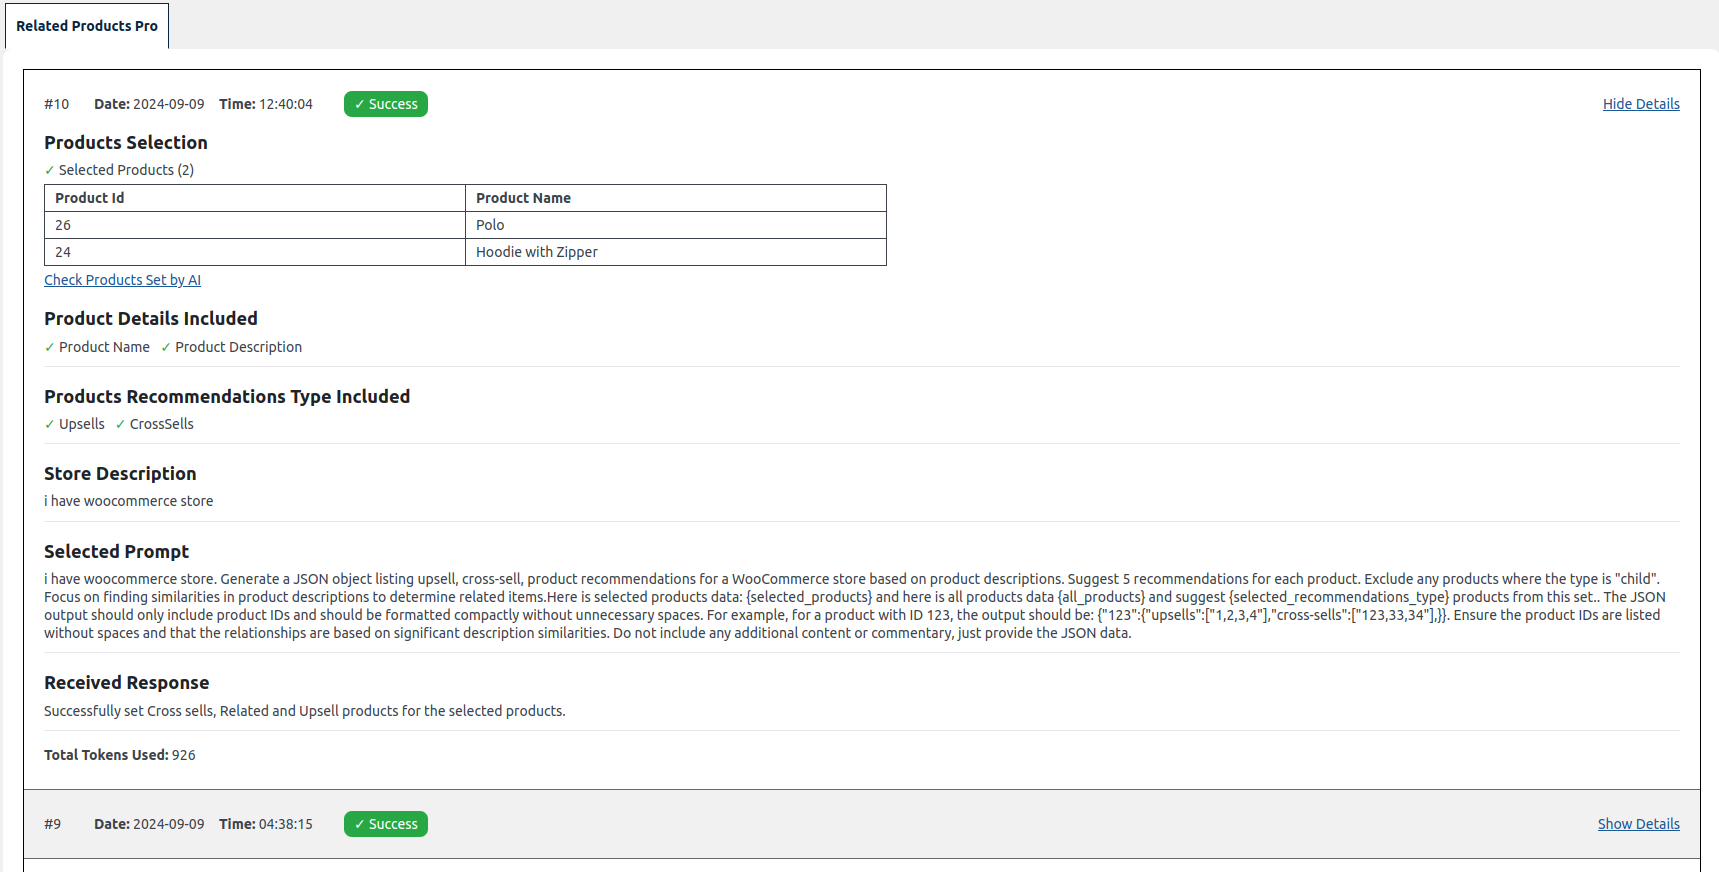
The AI Request Logs page provides a comprehensive record of all AI-related requests made through the plugin. This log includes critical details that help admins track and review the requests, ensuring transparency and accuracy in the recommendation process.
The AI Request Logs page provides a comprehensive record of all AI-related requests made through the plugin. This log includes critical details that help admins track and review the requests, ensuring transparency and accuracy in the recommendation process.
Key Features:
- Date and Time: Each log entry displays the exact date and time when the request was made, allowing you to track the history of AI interactions.
- Request Status: The log shows whether the AI request was successful or failed, with a clear visual indicator (green for success, red for failure).
- Selected Options: Each log entry records the specific options chosen for the request, including whether the admin selected all products, specific categories, or individual products.
- Token Usage: The log provides details on the total number of tokens used for each request, helping you monitor API usage.
- Detailed View: By clicking on the “Show Details” link next to each log entry, you can view a detailed breakdown of the request. This includes the upsells, related products, and cross-sells that were set during that specific interaction.
- Edit Product Recommendations Set by AI: The detailed view also includes a direct link that navigates you to the bulk edit page, where you can review or modify the upsells, related products, and cross-sells product recommendations set by AI for your store.
Renewal of ChatGPT API Tokens
If your AI Prompt tokens expire and you’re unable to generate prompts using ChatGPT, you will need to renew your credit limit. Follow these steps to renew your tokens:
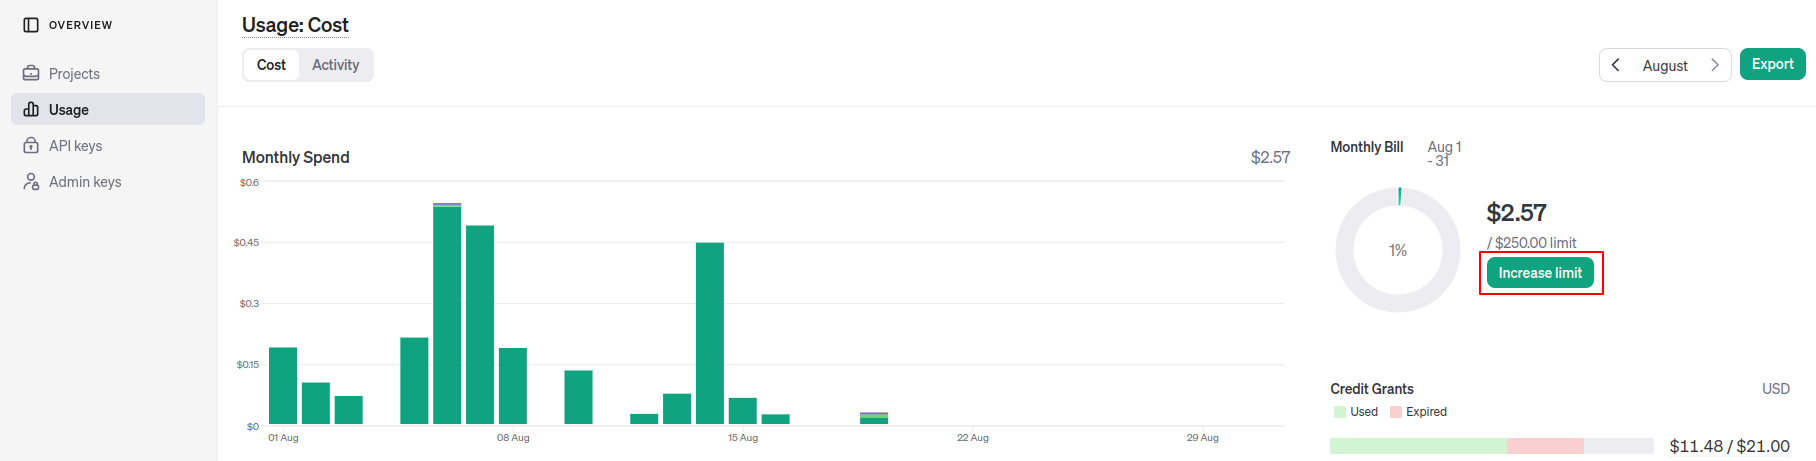
1. Go to the Open AI dashboard we first visited, and click on the “Usage” menu.
2. Here you will find the “Increase limit” button. Clicking it will redirect you to the billing section.
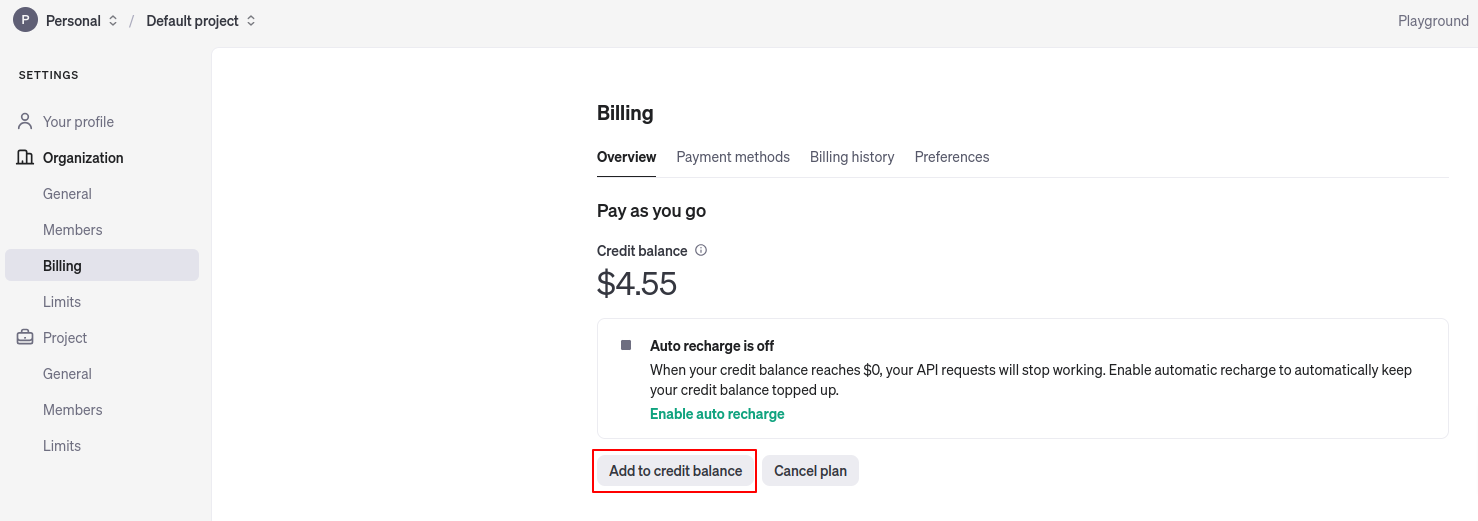
3. In the billing section, click on “Add to credit balance”. Here, a pop up will appear where you can enter your payment details.
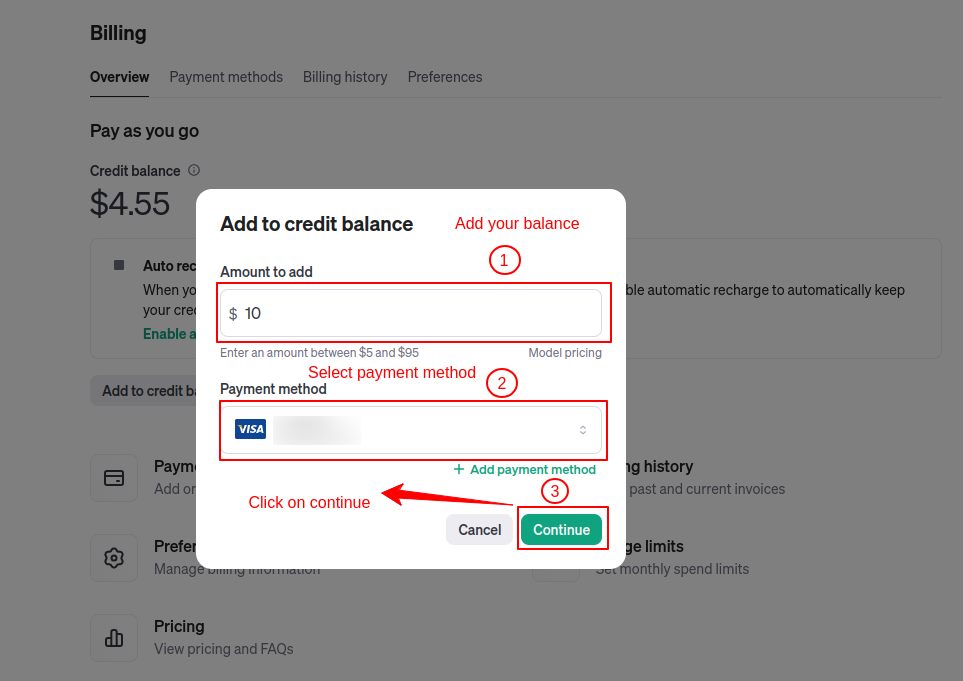
4. Add the desired amount, select your payment method, and click “Continue.”
5. Once your payment is successfully processed, the credit balance will be added to your account. You can verify this on your Usage dashboard.
Setting Up General Settings
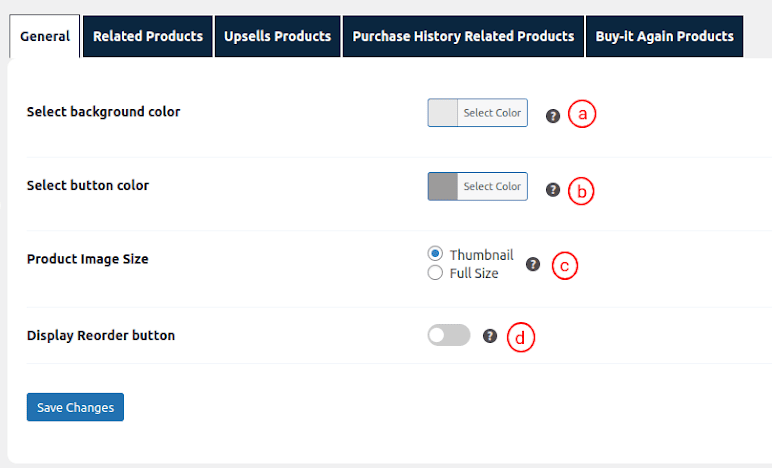
- Select background color: This setting allows admin to pick the background color to change the background color of the product slider.
- Select button color: This setting allows admin to pick the color to change the color of the previous and next button within the Products slider.
- Product Image Size: This setting allows admin to select image size of products to display to users.
The chosen background color in the ‘Select Background Color‘ setting will be applied as the background color. Similarly, the color selected in the ‘Select Button Color‘ setting will be utilized for the previous and next buttons within the product slider.
By default, the background color is set to gray, and the button color is set to black for the product slider as shown in the image above. The ‘Product Image Size‘ setting determines the size of images displayed in the product slider and products page for all the features.
Settings for Related Products
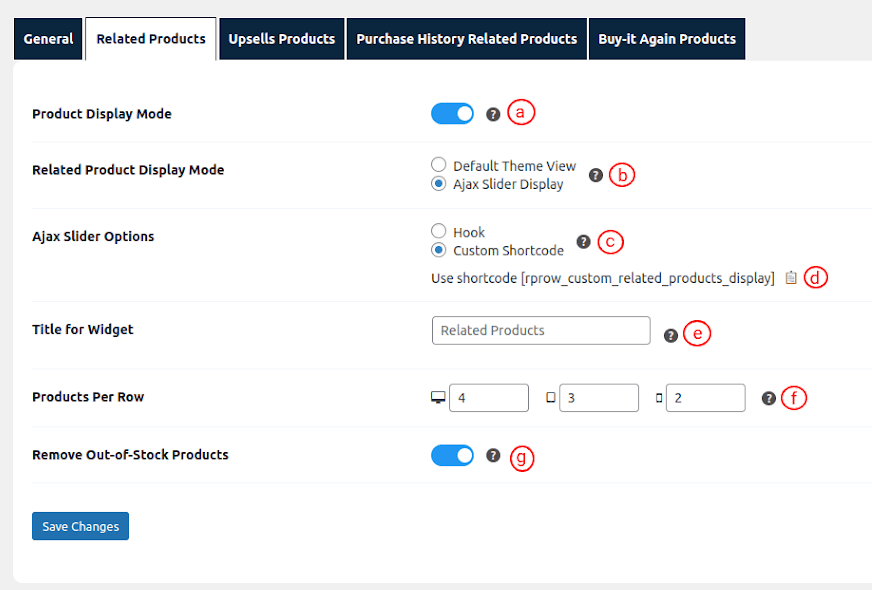
- Product Display Mode: This setting allows admin to Hide Related Products section on Product page. By default related products will be displayed according to the setting provided.
- Related Product Display Mode: This setting allows admin to choose the mode for displaying related products: Default Theme or AJAX Slider.
- Ajax Slider Options: This setting allows user to Opt for a shortcode with or without parameters. If rendered without “id” parameters, the product page will display related products by using the id of the current product.
- Using the button (d), admins can copy a shortcode to paste on any page. This shortcode renders the product’s slider.
- Products Per Row: This setting enables administrators to specify the number of products displayed in the ‘Related Products’ slider for various resolutions, including desktop, tablet, and mobile.
- Title for Widget: This setting allows admin to specify the title admin wants to display for the “Related Products” widget, product slider and products page.
- Remove Out-of-Stock Products : This setting allows admin to include or exclude out of stock products. By default all out-of-stock products are not shown.
Settings for Upsells Products
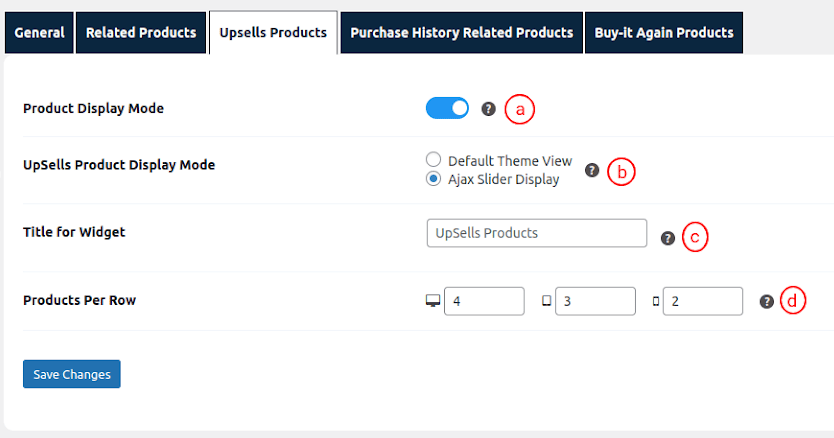
- Product Display Mode: This setting allows admin to Hide UpSells Products section on Product page. By default related products will be displayed according to the setting provided.
- UpSells Product Display Mode: This setting allows admin to choose the mode for displaying related products: Default Theme or Shortcode.
- Title for Widget: This setting enables admin to specify the title admin want to show for “UpSells Products” widget and shortcode.
- Products Per Row: This setting allows admin to specify the number of products admin wish to showcase within the “UpSells Products” AJAX slider.
Settings for Related Products on Product Page
To configure related products filter on specific product navigate to product page and under Linked Products.
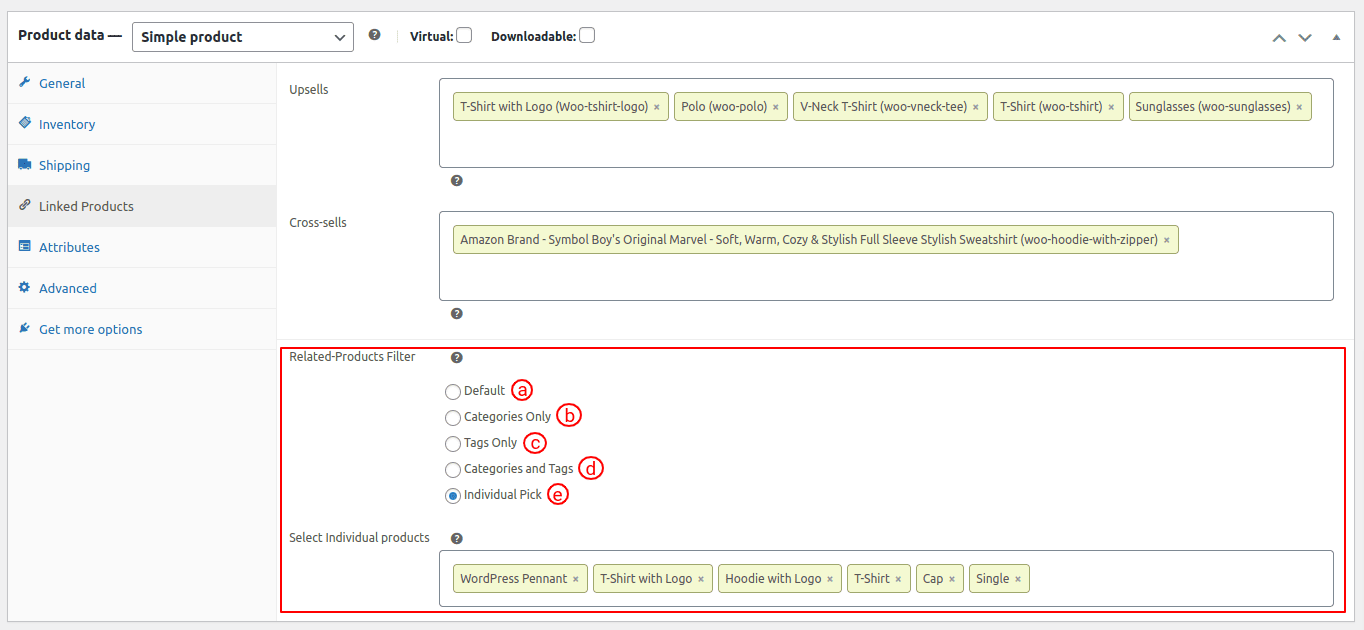
- Default: This setting is selected by default when no filter is selected initially.
- Categories only: This configuration enables admin to include or exclude multiple categories when compared to the entire range of available products.
- Tags only: This configuration enables admin to include or exclude multiple categories when compared to the entire range of available products.
- Categories and tags: This option enables a comprehensive filter, considering both categories and tags simultaneously.
- Individual pick: This feature enables administrators to selectively choose multiple products to be displayed as related products.
Related Products Slider
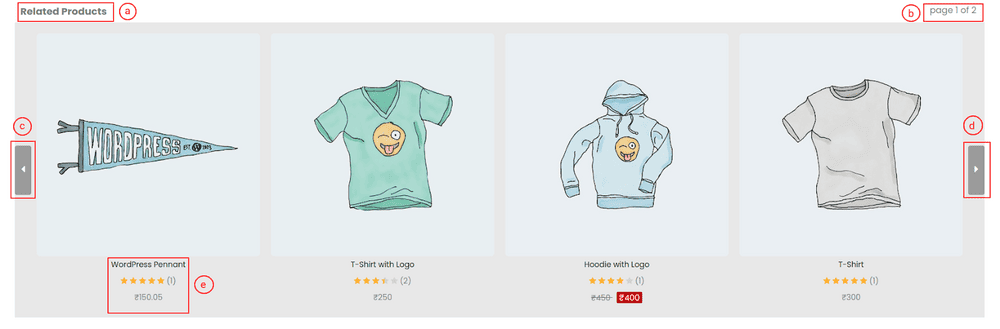
- The product slider title is presented first.
- Initial pagination reads ‘Page 1 of n,’ and upon clicking the previous and next buttons, the page number adjusts accordingly.
- The previous button allows users to navigate through the product slider. Initially on ‘Page 1 of n,’ clicking the previous button transitions to ‘Page n of n.’ If the number of products in a row matches the limit set in the ‘Products Per Row’ setting, the back button is hidden.
- The next button facilitates users in navigating the product slider. Upon reaching the last page, clicking the next button enables users to return to ‘Page 1 of n.’ Similar to the previous button, if the number of products in a row matches the specified limit in ‘Products Per Row,’ the back button is hidden.
- Product information includes the title, product rating, and, if applicable, a struck-out original price with the highlighted sale price when the product is on sale.
Shortcode [rprow_custom_related_products_display id=”20” desktop_limit=”3″ tab_limit=”3″ mobile_limit=”1″] has 4 parameters namely id, desktop_limit, tab_limit; mobile_limit.
- id: The administrator should provide the product ID for a specific item, and the related products will be displayed in the slider. The ‘id’ parameter cannot be used on the product page since it refers to the ID of the current product. Instead, the ‘id’ parameter can be utilized to highlight related products according to the provided ‘id’.
- desktop_limit: The administrator needs to specify the number of products to be displayed in a single row for desktop. If the ‘desktop_limit’ parameter is not utilized, the number of products shown in the slider will be determined by the ‘Products per row’ setting, which is a general setting applicable to all related product shortcodes and not specific to a particular one.
- tab_limit: The administrator needs to specify the number of products to be displayed in a single row for tab. If the tab_limit parameter is not utilized, the number of products shown in the slider will be determined by the ‘Products per row’ setting, which is a general setting applicable to all related product shortcodes and not specific to a particular one.
- mobile_limit: The administrator needs to specify the number of products to be displayed in a single row for mobile. If the mobile_limit parameter is not utilized, the number of products shown in the slider will be determined by the ‘Products per row’ setting, which is a general setting applicable to all related product shortcodes and not specific to a particular one.
View Upsells Products

- The product slider title is presented first, accompanied by a ‘See More’ link redirecting users to a dedicated page showcasing all products of that feature. The link guides users to the default page designed to showcase all products, unless an alternative page has been chosen to display the entire product range.
- Initial pagination reads ‘Page 1 of n,’ and upon clicking the previous and next buttons, the page number adjusts accordingly.
- The previous button allows users to navigate through the product slider. Initially on ‘Page 1 of n,’ clicking the previous button transitions to ‘Page n of n.’ If the number of products in a row matches the limit set in the ‘Products Per Row’ setting, the back button is hidden.
- The next button facilitates users in navigating the product slider. Upon reaching the last page, clicking the next button enables users to return to ‘Page 1 of n.’ Similar to the previous button, if the number of products in a row matches the specified limit in ‘Products Per Row,’ the back button is hidden.
- Product information includes the title, product rating, and, if applicable, a struck-out original price with the highlighted sale price when the product is on sale.
Bulk Management

- Allows you to Search for products using different criteria like Product Name, Product Category, Product SKU and Product Tags.
- You can Bulk Update WooCommerce Related, Upsells and Cross-sells for all products that fulfill your search criteria.
- Allows you to Copy and Paste related, upsells and cross-sells across different products in seconds.
- Works with all types of WooCommerce products – Simple, Variable, Grouped, and Downloadable.