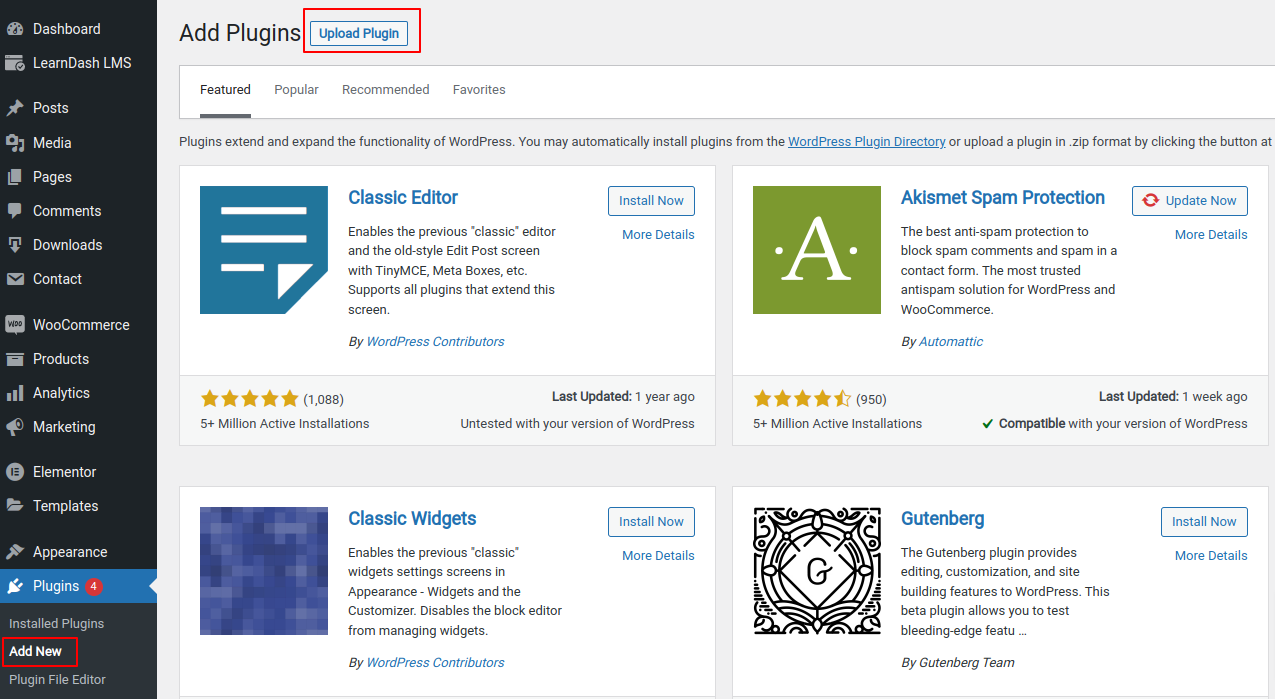
- In WordPress download the Plugin file & navigate to Plugins > Add New
- Click Upload Plugin
- Browse for the .zip file you downloaded in Step 1
- Click Install Now
- Click Activate Plugin.
Installation Instruction
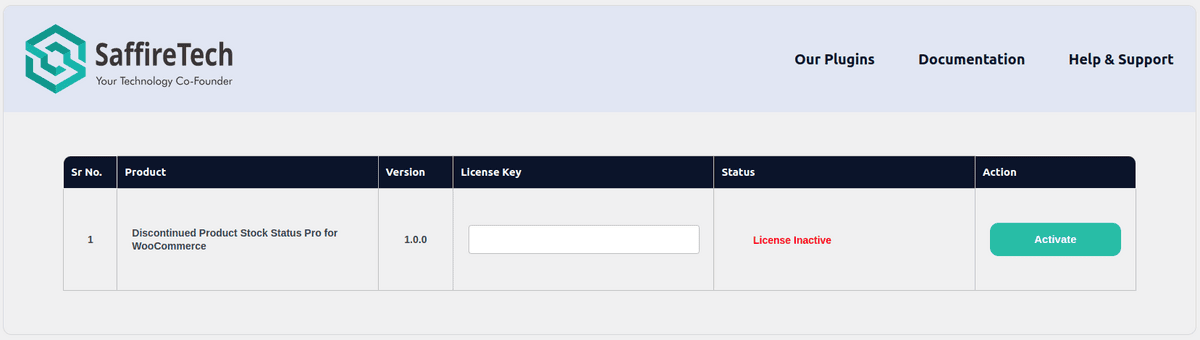
License Activation
- Navigate Plugins > Activate Licence Key.
- Find your license key in the Purchase Receipt sent to your email or you can retrieve it from, My Account > Purchase History > View Licenses on the SaffireTech website.
- Enter Your license key in the license key field.
- Click Activate License.
- You will find the validity of your license below.
General Settings
- To access the General Settings, you have two straightforward options:
-
- Select ‘Settings‘ directly on the plugin tile for ‘Discontinued Product Stock Status Pro for WooCommerce‘ This will promptly direct you to the dedicated general settings page.

-
- Navigate to WooCommerce > Settings > Discontinued Products Tab. Here, you can seamlessly access the General Settings tailored to your preferences.
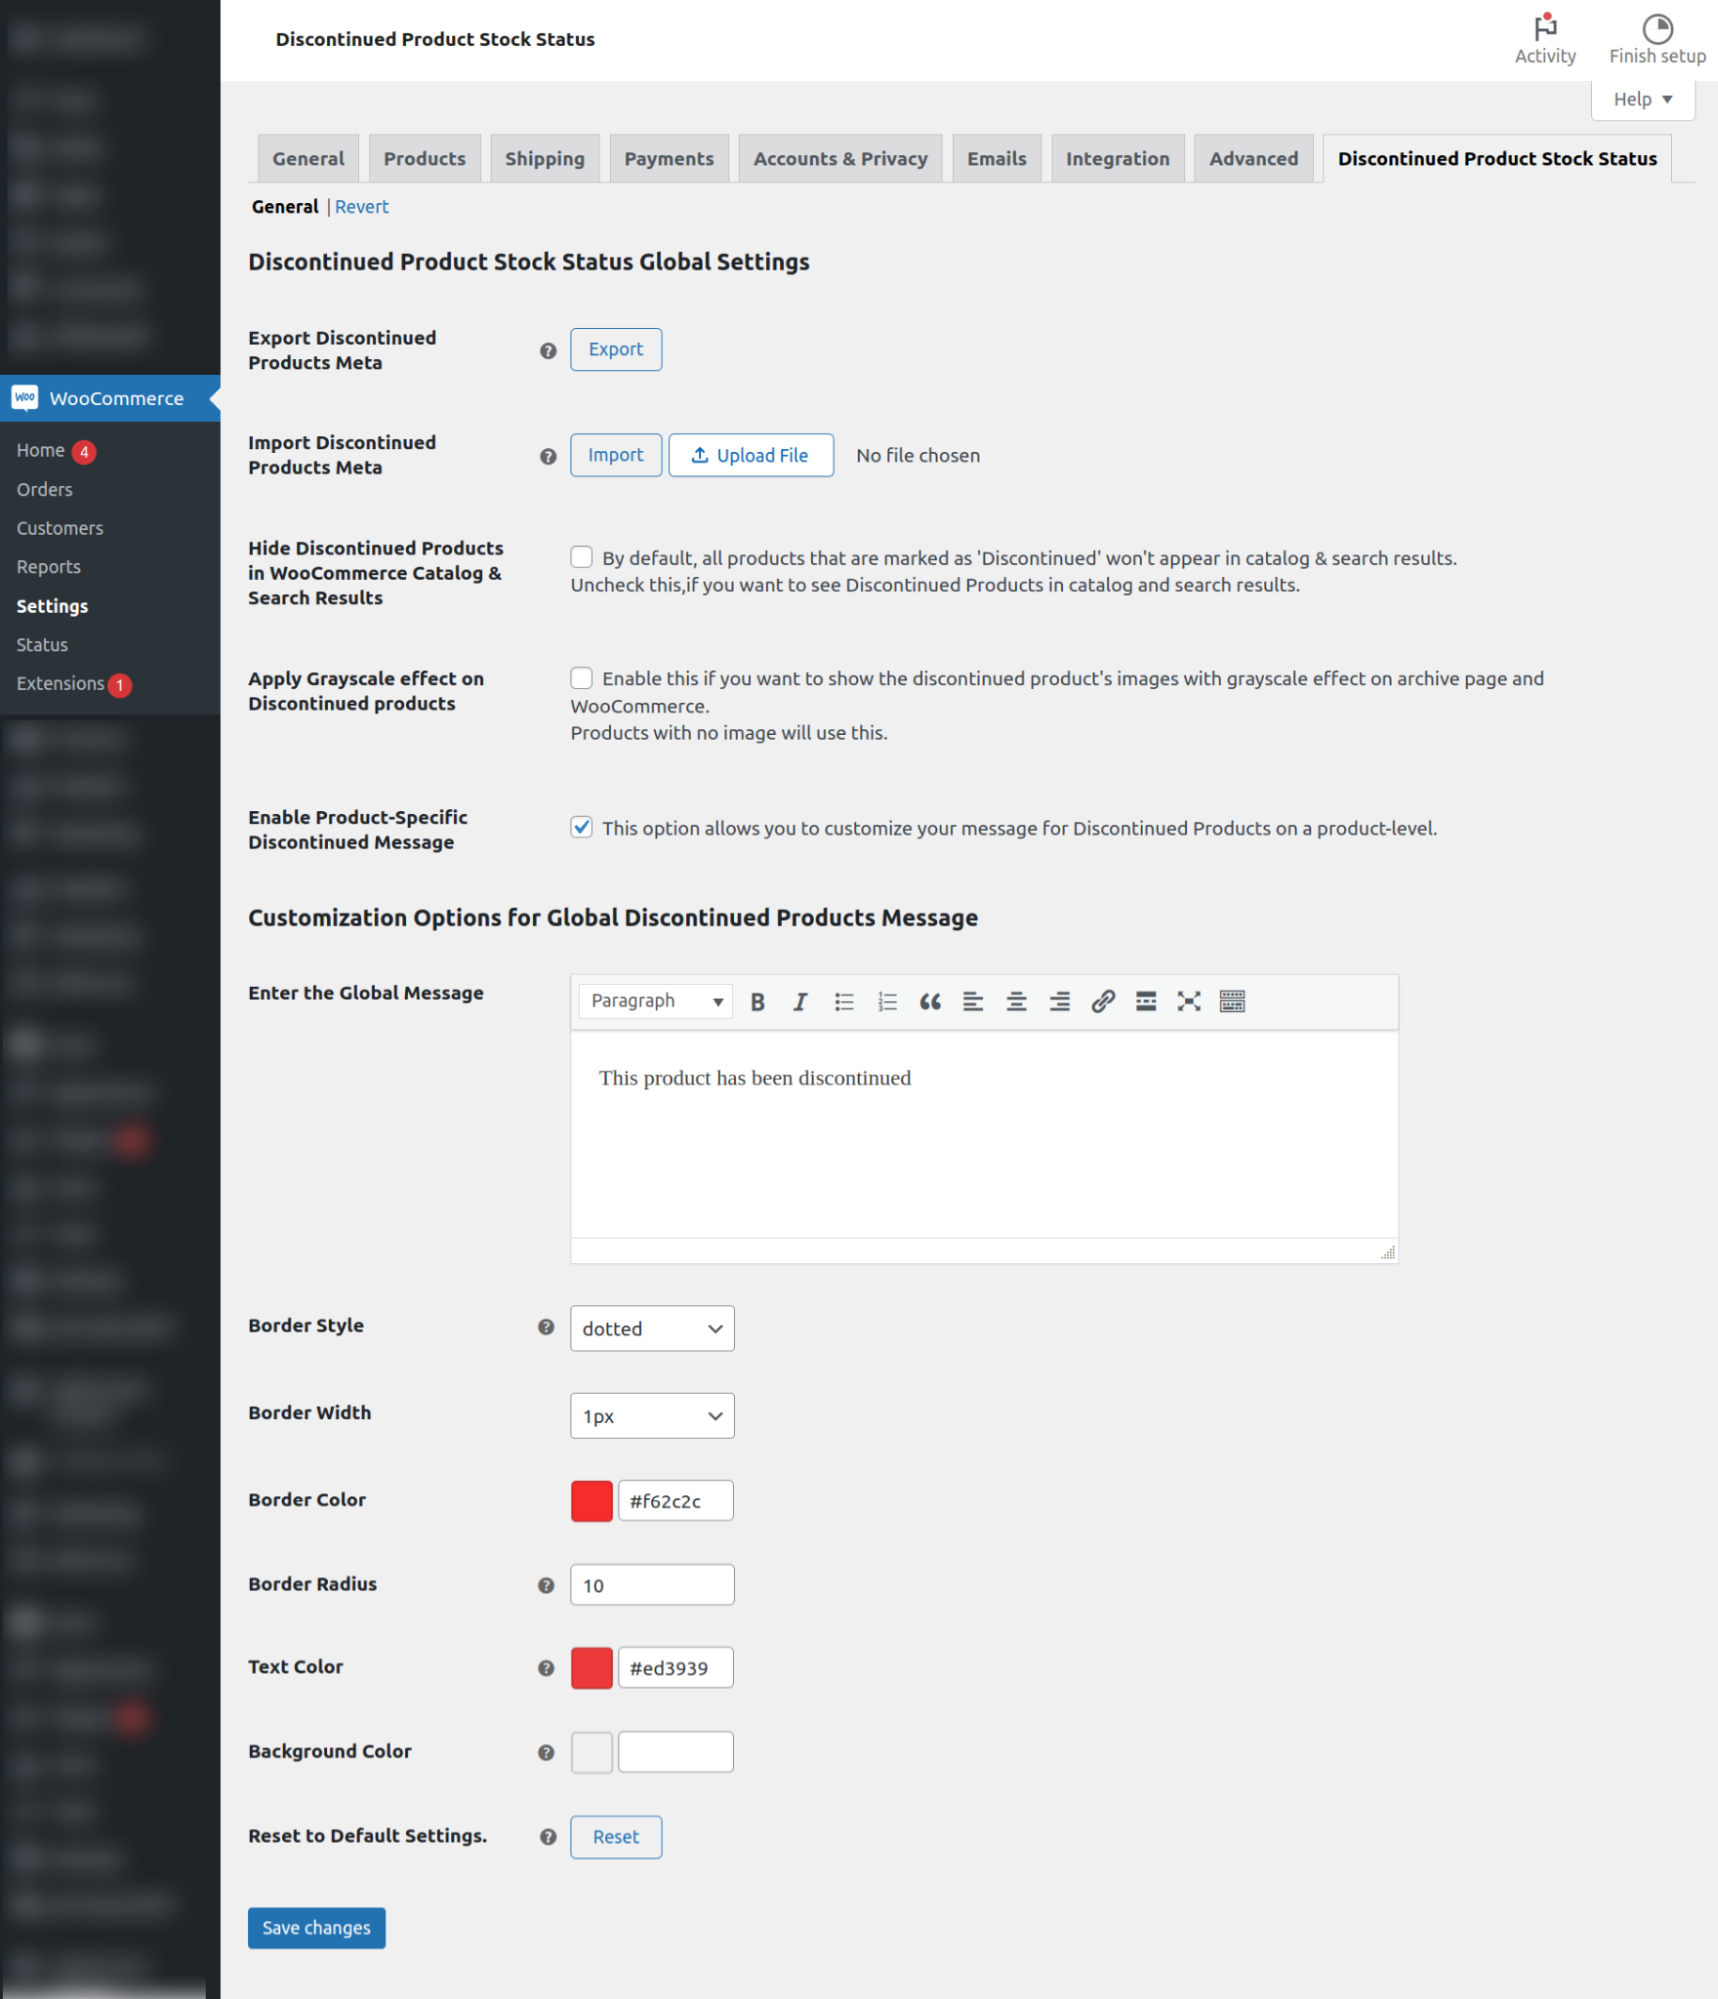
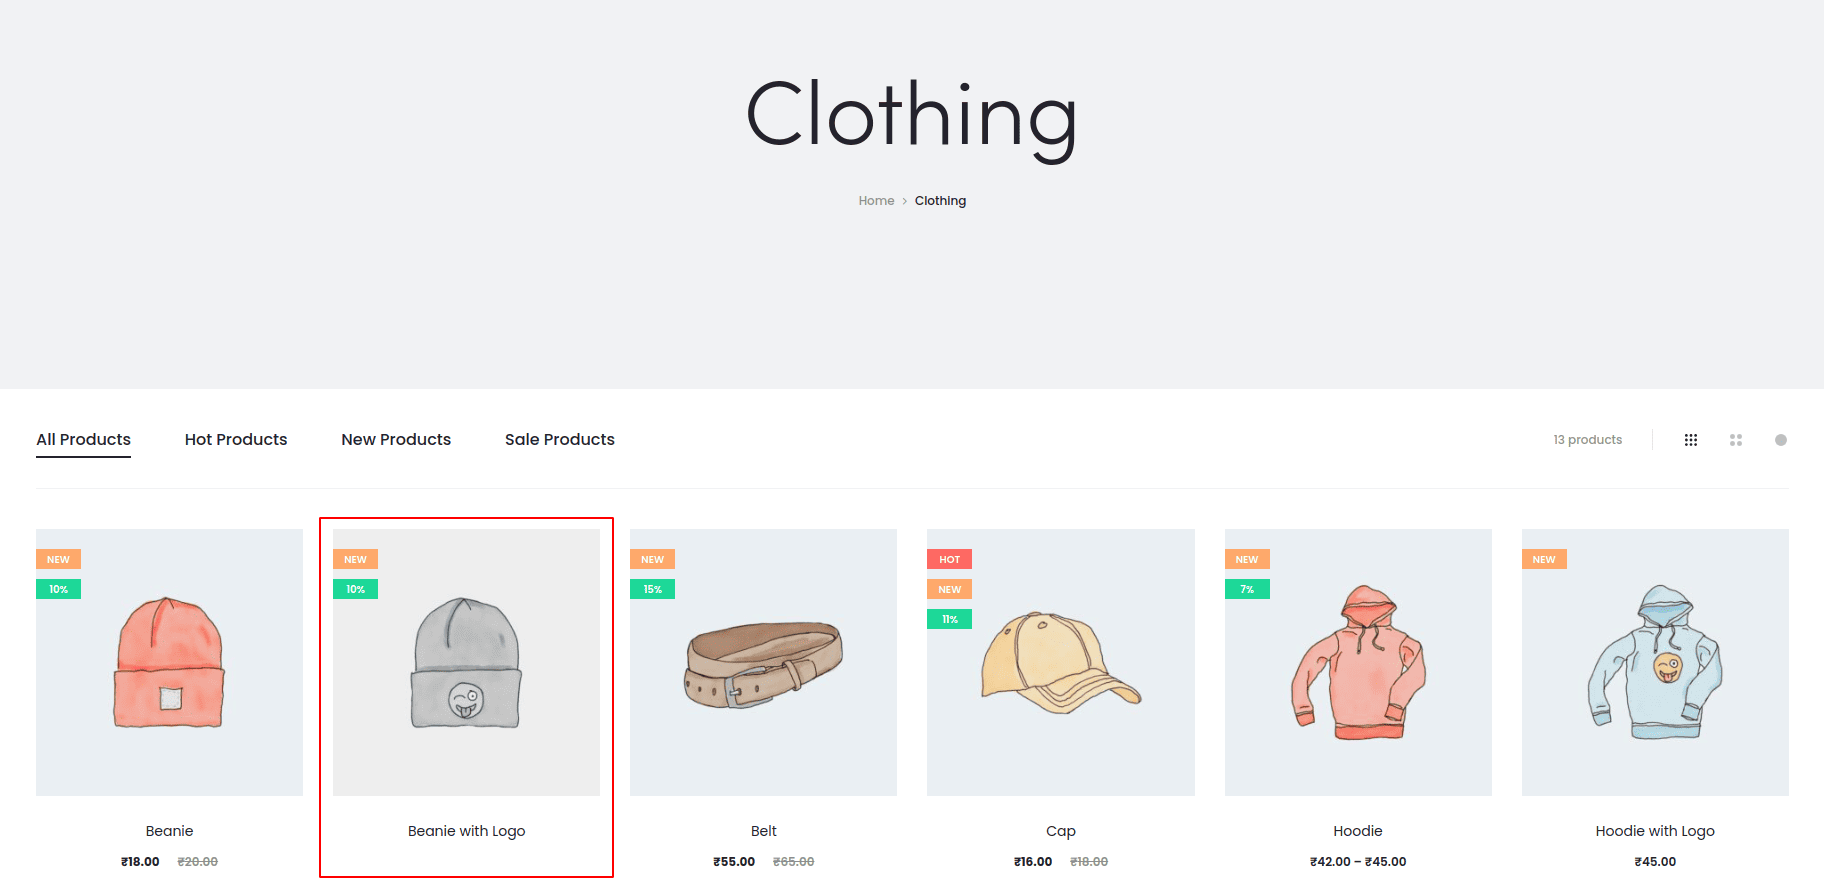
- In general settings, the first field is ‘Show Discontinued products in WooCommerce catalog?’ is used, when a product is no longer available, it won’t show up in the WooCommerce Catalog. But if you want those products to still appear on the archive page or when using WooCommerce shortcodes, you can change the settings to make it happen.
- If you choose ‘Show Discontinued products in WooCommerce catalog‘, a new option, ‘Apply Grayscale effect on Discontinued products‘, will appear. Enabling this feature adds a grayscale effect to images of discontinued products on the archive page and when using WooCommerce shortcodes.
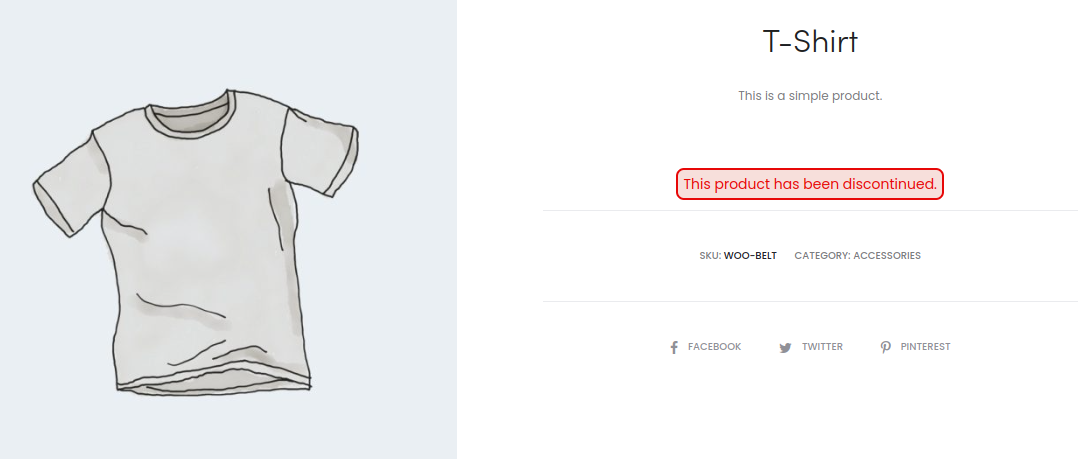
- Choosing ‘Disable custom discontinued message for discontinued products‘ will override all the custom discontinued messages with a global discontinued message.
- Enter the Global Message: You can use the WYSIWYG editor here to customize your global discontinued message. This field enables you to set a customized message globally for all discontinued products, ensuring a consistent and tailored approach across your entire product range.

- Border Style: You can set border style for the global discontinued message.
- Border Width: Set border width for the global discontinued message.
- Border Color: Set border color for the global discontinued message.
- Border Radius: Set border radius for the global discontinued message.
- Text Color: Set the text color for the global discontinued message.
- Background Color: Set the background color for the global discontinued message.
- When you choose ‘Hide Discontinued Products showing up in your Website’s search results‘, this option ensures that all discontinued products are concealed and won’t appear in your website’s search results. This provides a streamlined and focused search experience for your users by excluding discontinued items from the search output.
Exporting Discontinued Product Settings.
Note: This export feature only exports discontinued products meta and NOT discontinued products.
We assume you have already imported all the products from your old site to your new site using WooCommerce’s default export feature or any third-party export-import plugin.
Once this is done, you can proceed with the next below:
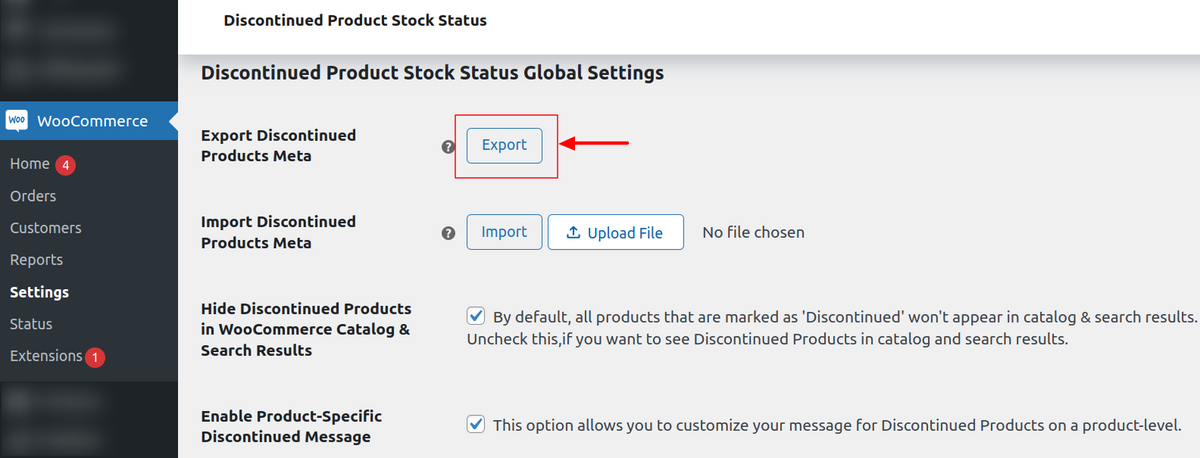
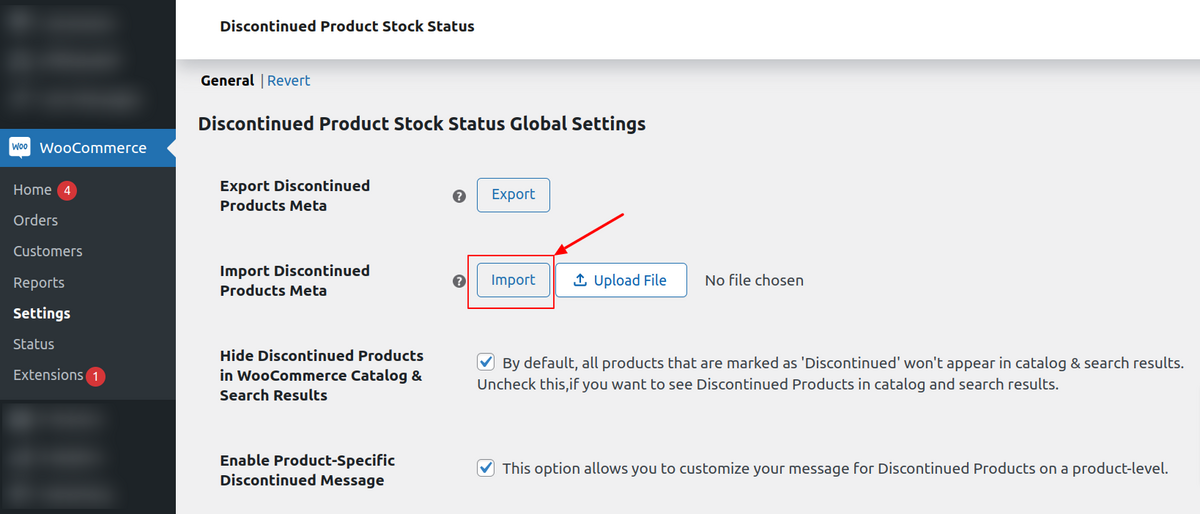
Go to Woocommerce > Settings > Discontinued Products
1. In general settings. You will find the Export button.
2. Click on this Export button to export discontinued product settings.
3. When the ‘dpssw-export.csv’ starts to download an alert will pop up and display the number of discontinued products settings getting exported.

4. This is the Exported Discontinued Products Csv File.
Importing Discontinued Product Settings.
Note: This import feature only imports discontinued products meta and NOT discontinued products.
We assume you have already imported all the products from your old site to your new site using WooCommerce’s default export feature or any third-party export-import plugin.
Once this is done, you can proceed with the next below:
Go to Woocommerce > Settings > Discontinued Products
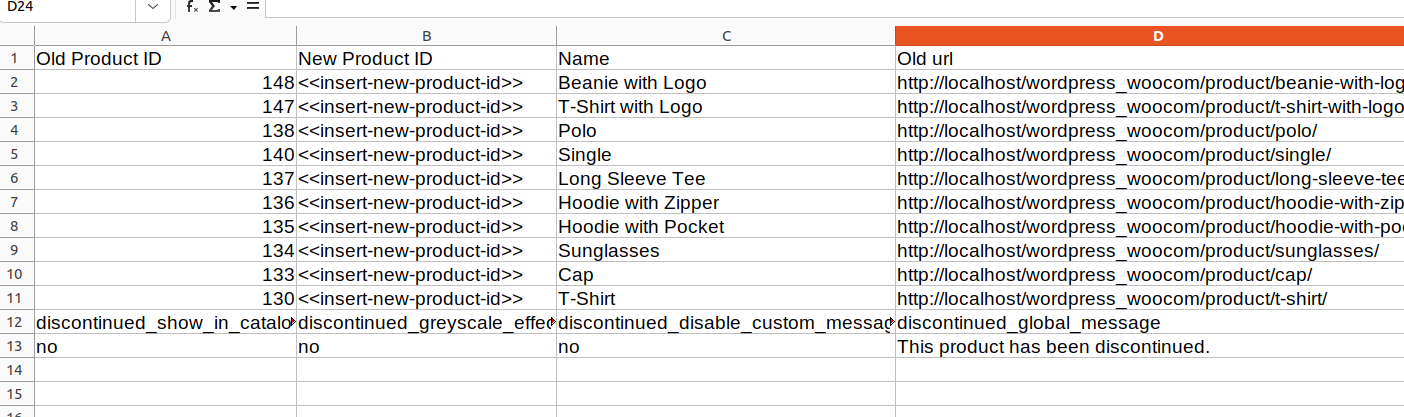
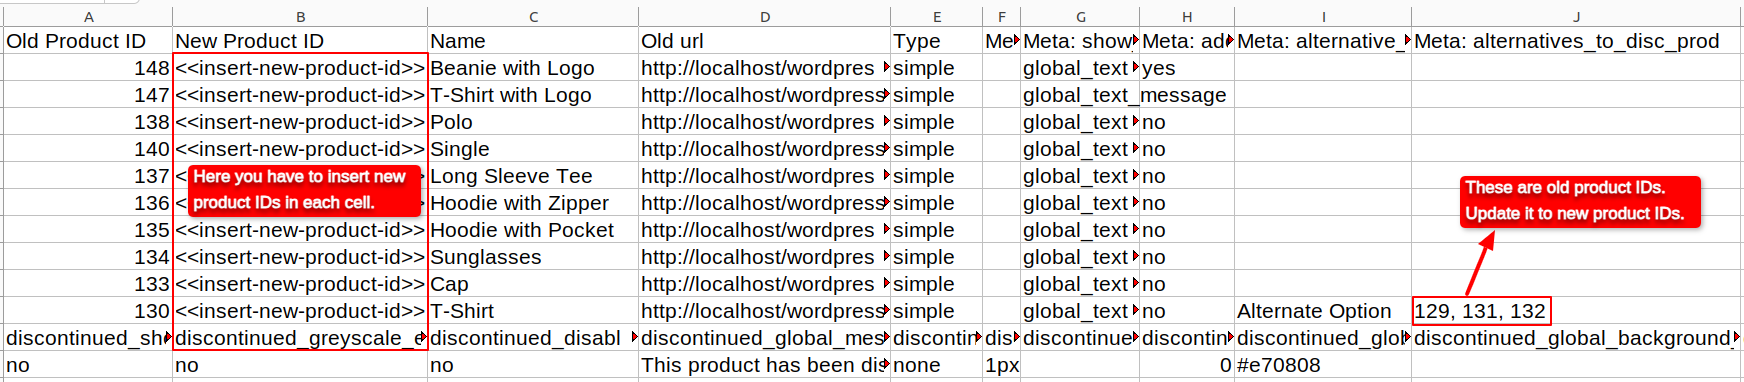
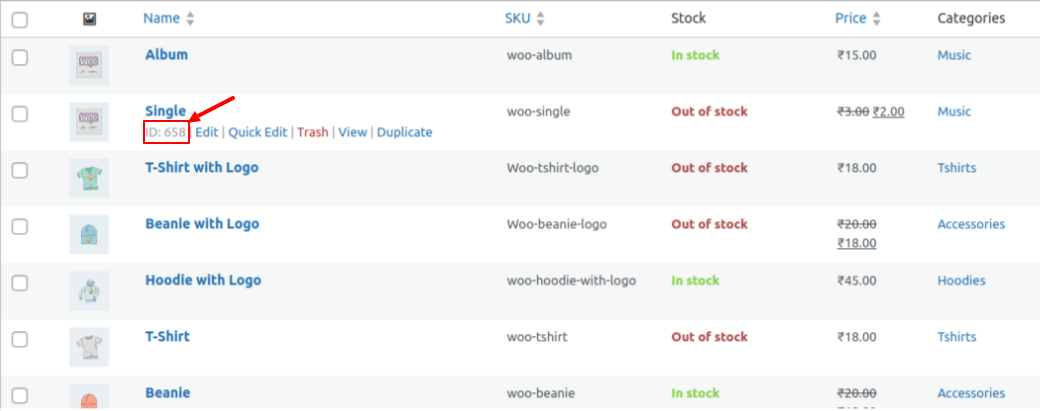
1. Open the ‘dpssw-export.csv’ file and add the new product ID in the ‘New Product ID’ column. This new product ID is the ID of the product present on the new site. (cross-check the names of products before adding the new product ID.)
You also have to update the IDs of column with the header ‘Meta: alternatives_to_disc_prod’. If not done, alternative products will not be added to the corresponding discontinued product.
Before
After adding new product IDs.
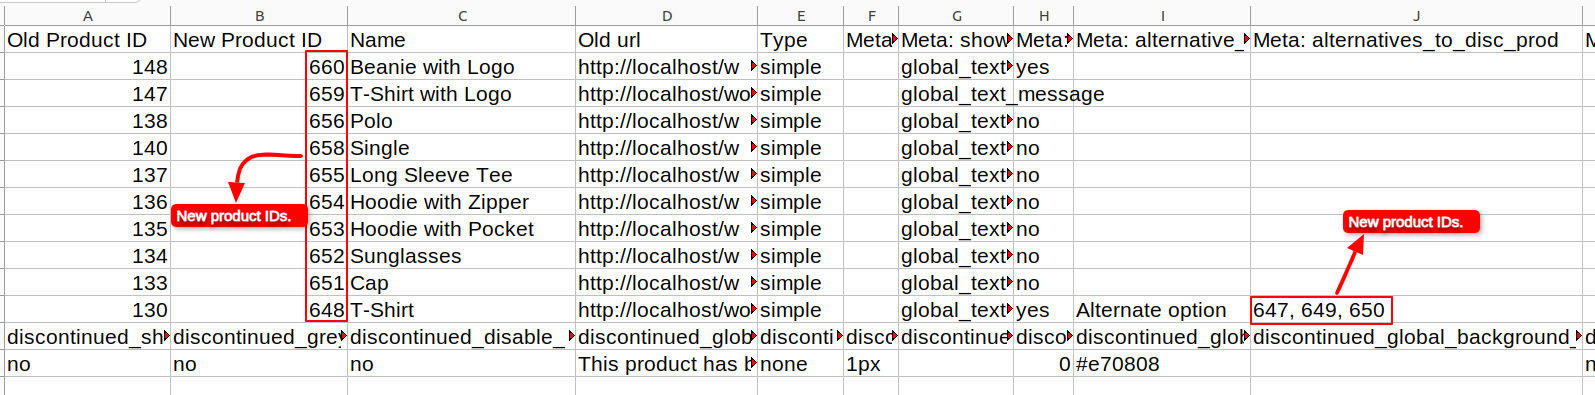
These are the new product ID’s of products present on new site.
2. Save this ‘dpssw-export.csv’ file. Go to Woocommerce > Settings > Discontinued Products. upload the updated CSV file and click on the import button.
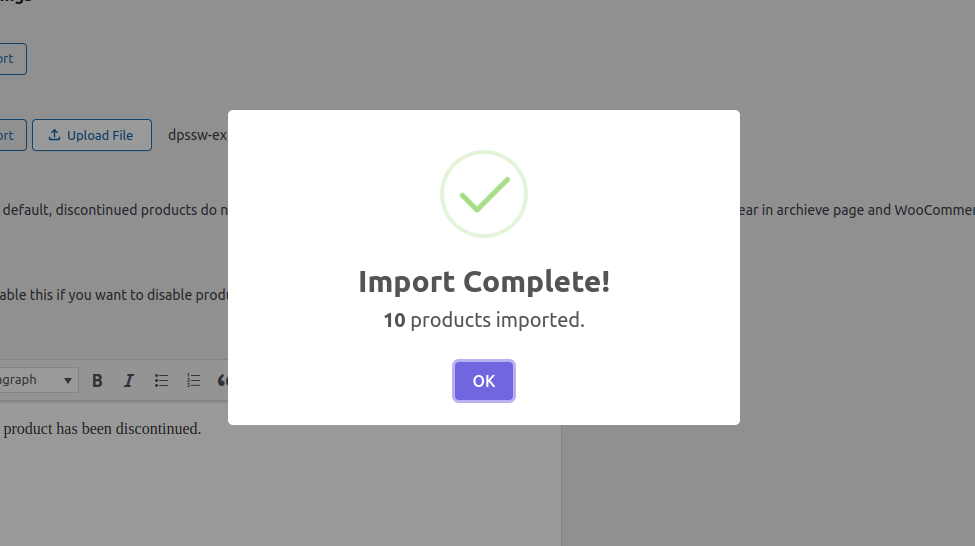
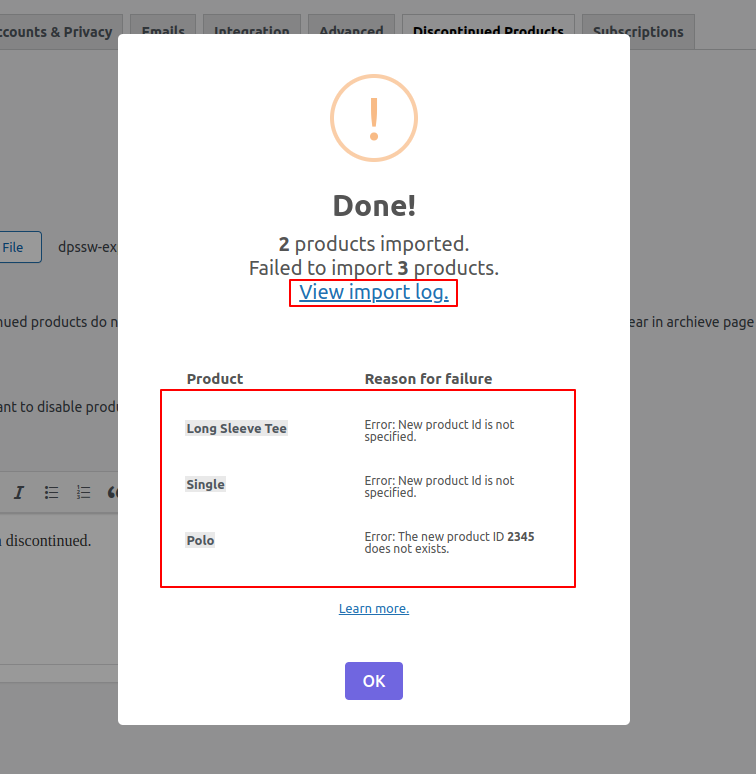
3. Once the setting is imported the following alert appears. Shows the details of how many products were imported.
4. If some products fail to import you can see the import log by clicking ‘View import log’.
Setting Up a Product as Discontinued
Go to Products > All Products.
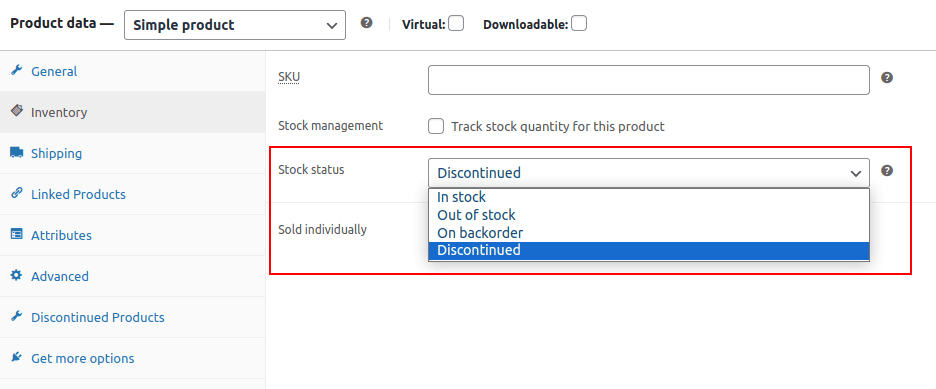
- To configure a Simple product as ‘Discontinued,’ follow these steps:
- Open the Product Edit page for the desired product.
- Navigate to the Inventory Tab within the Product Data meta box.
- Look for the drop-down menu labelled Stock Status.
- Select ‘Discontinued‘ from the options available.
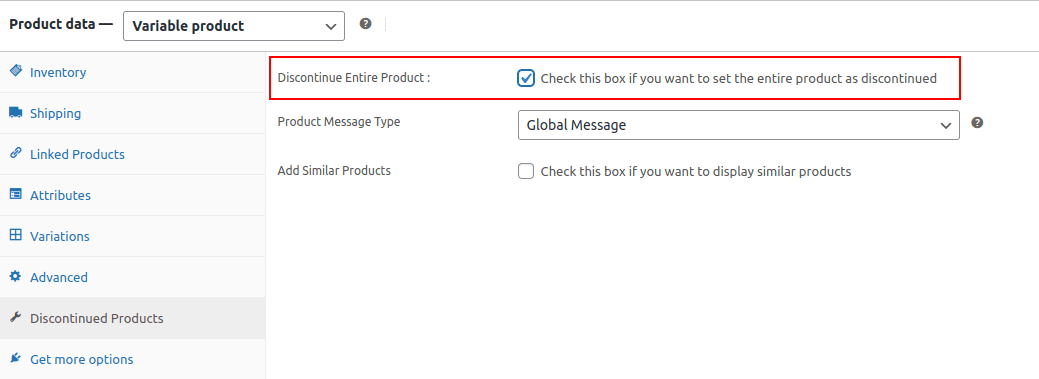
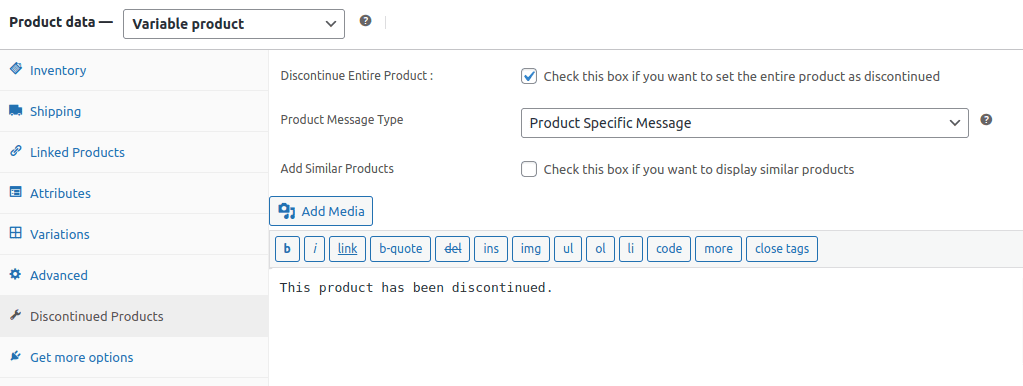
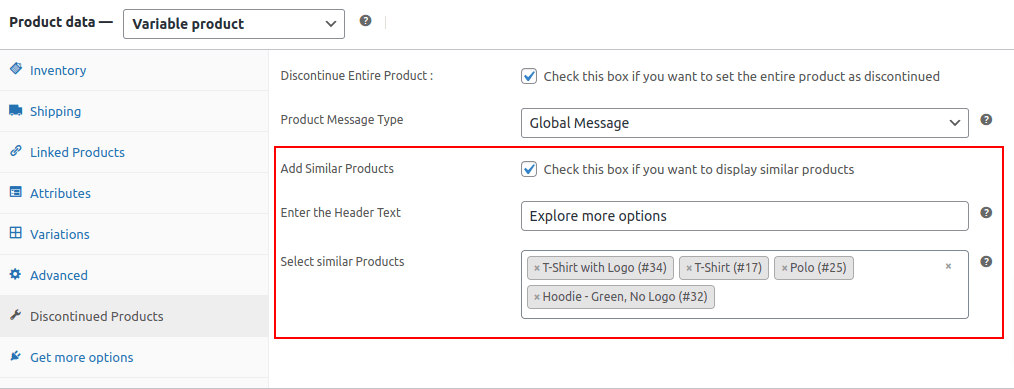
- To set up a Variable product as ‘Discontinued,’ follow these steps:
- Open the Product Edit page for the specific product.
- Navigate to the Discontinued Products Tab within the Product Data meta box.
- Select the checkbox labeled ‘Discontinued Product‘ to mark the product as discontinued.
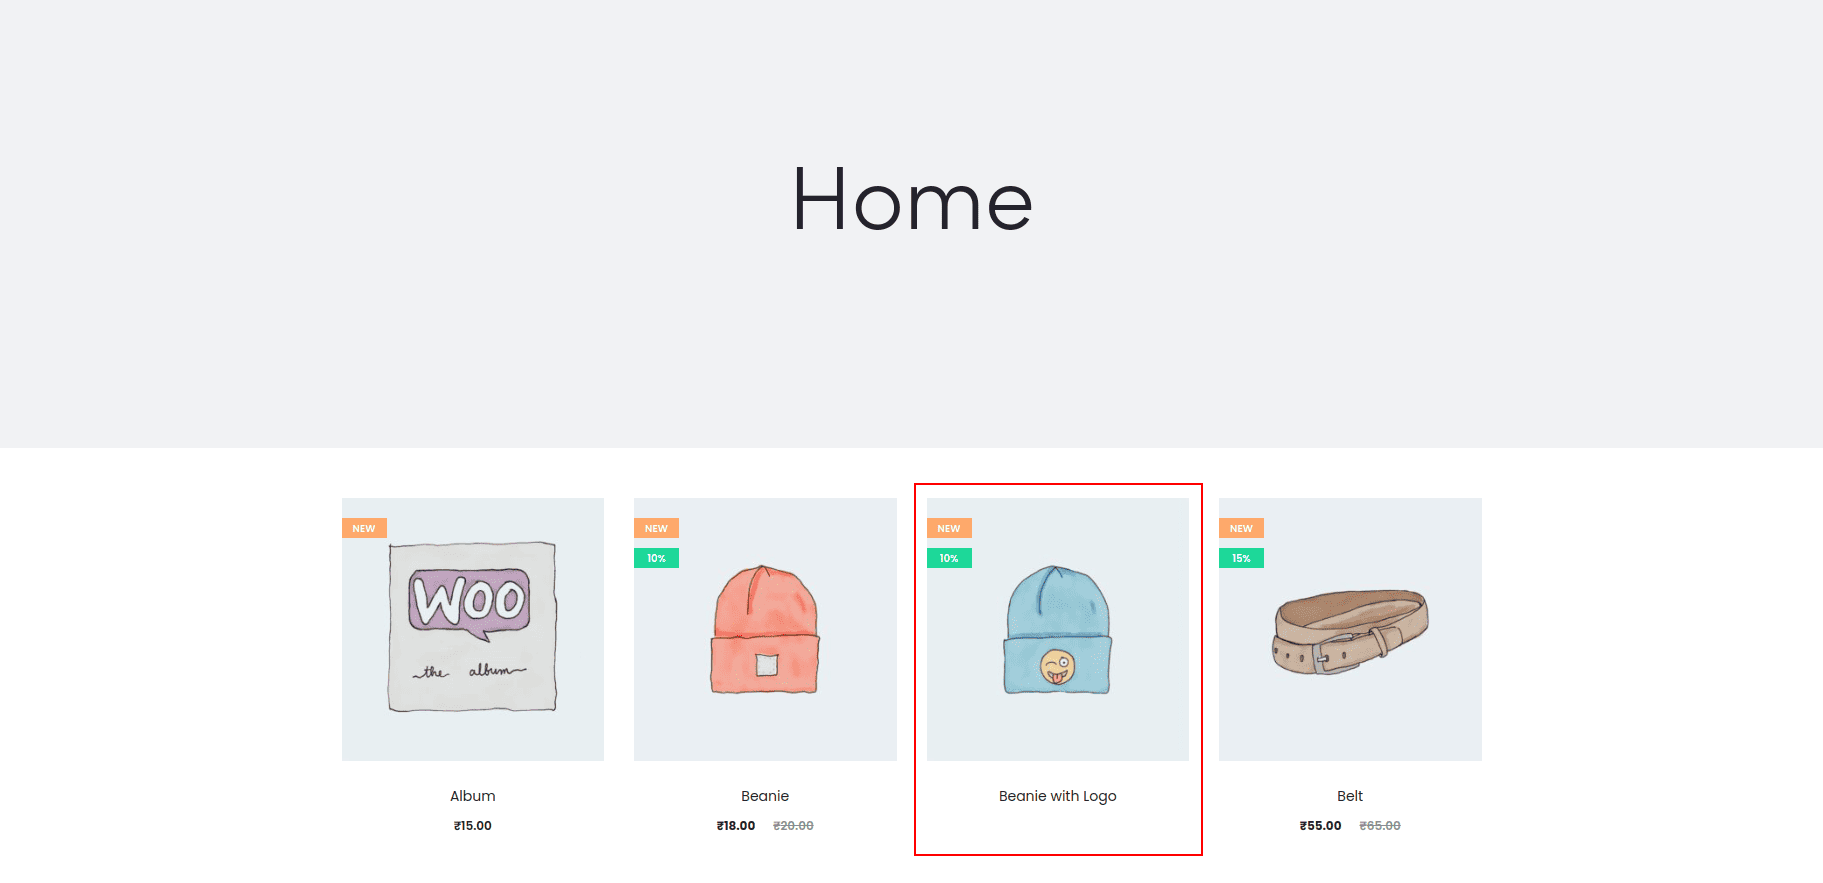
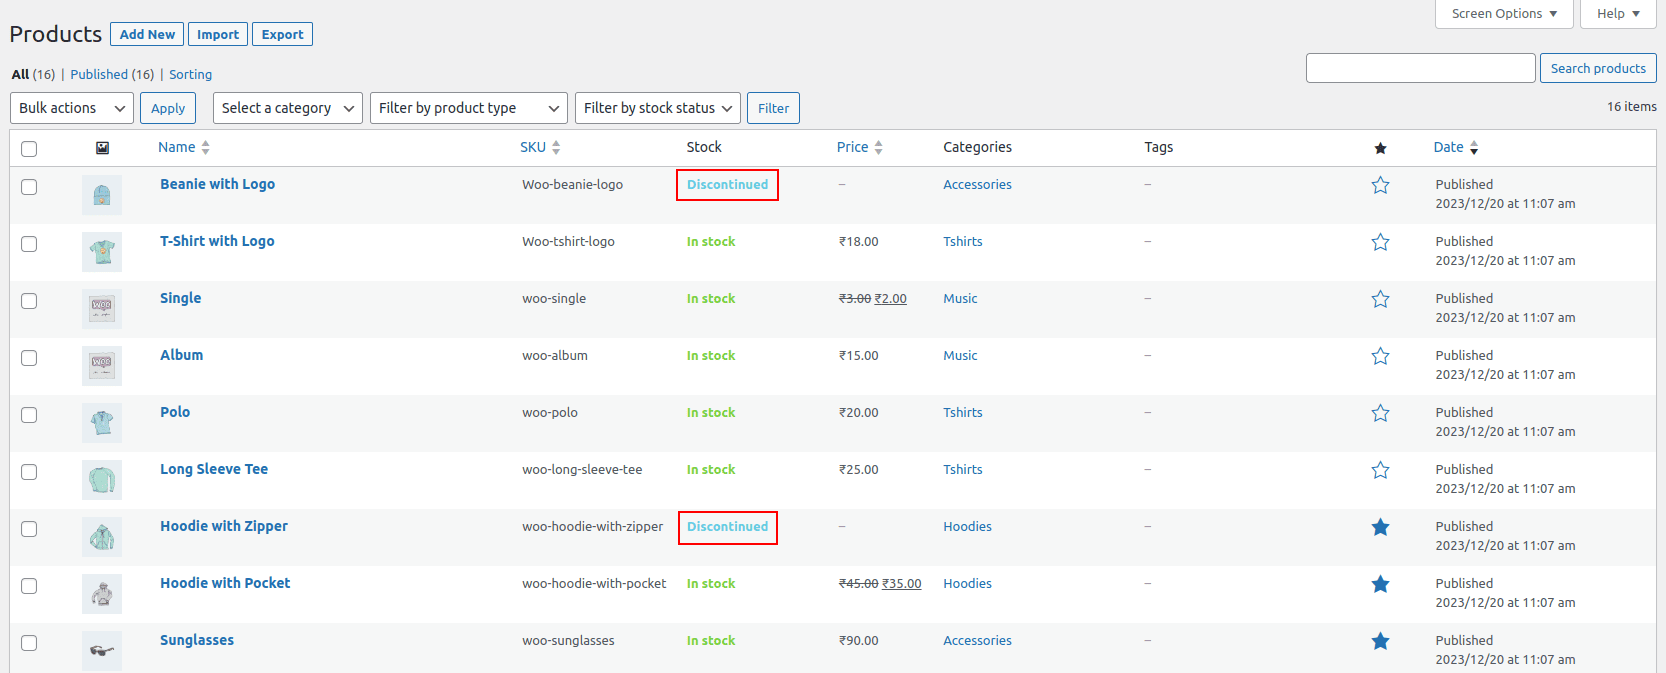
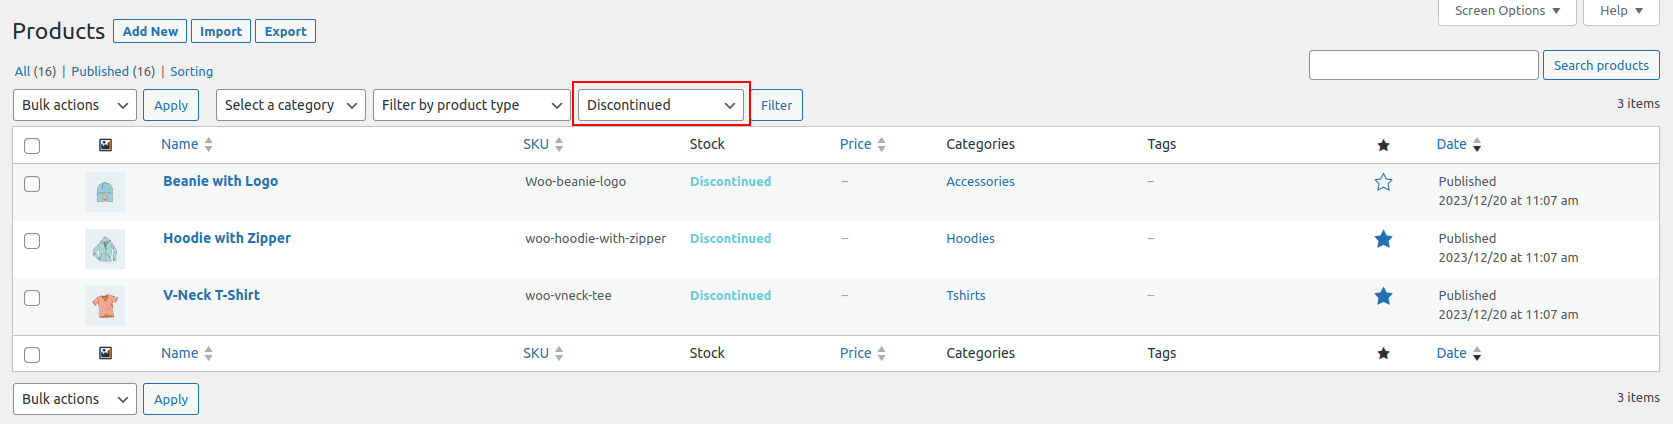
- You can easily list and filter Discontinued products directly from the WooCommerce Product List. Simply navigate to Products > All Products to access the product list and utilize the filtering options for efficient management.
Setting Custom Discontinued Message for Individual Products
- Go to Products > All Products.
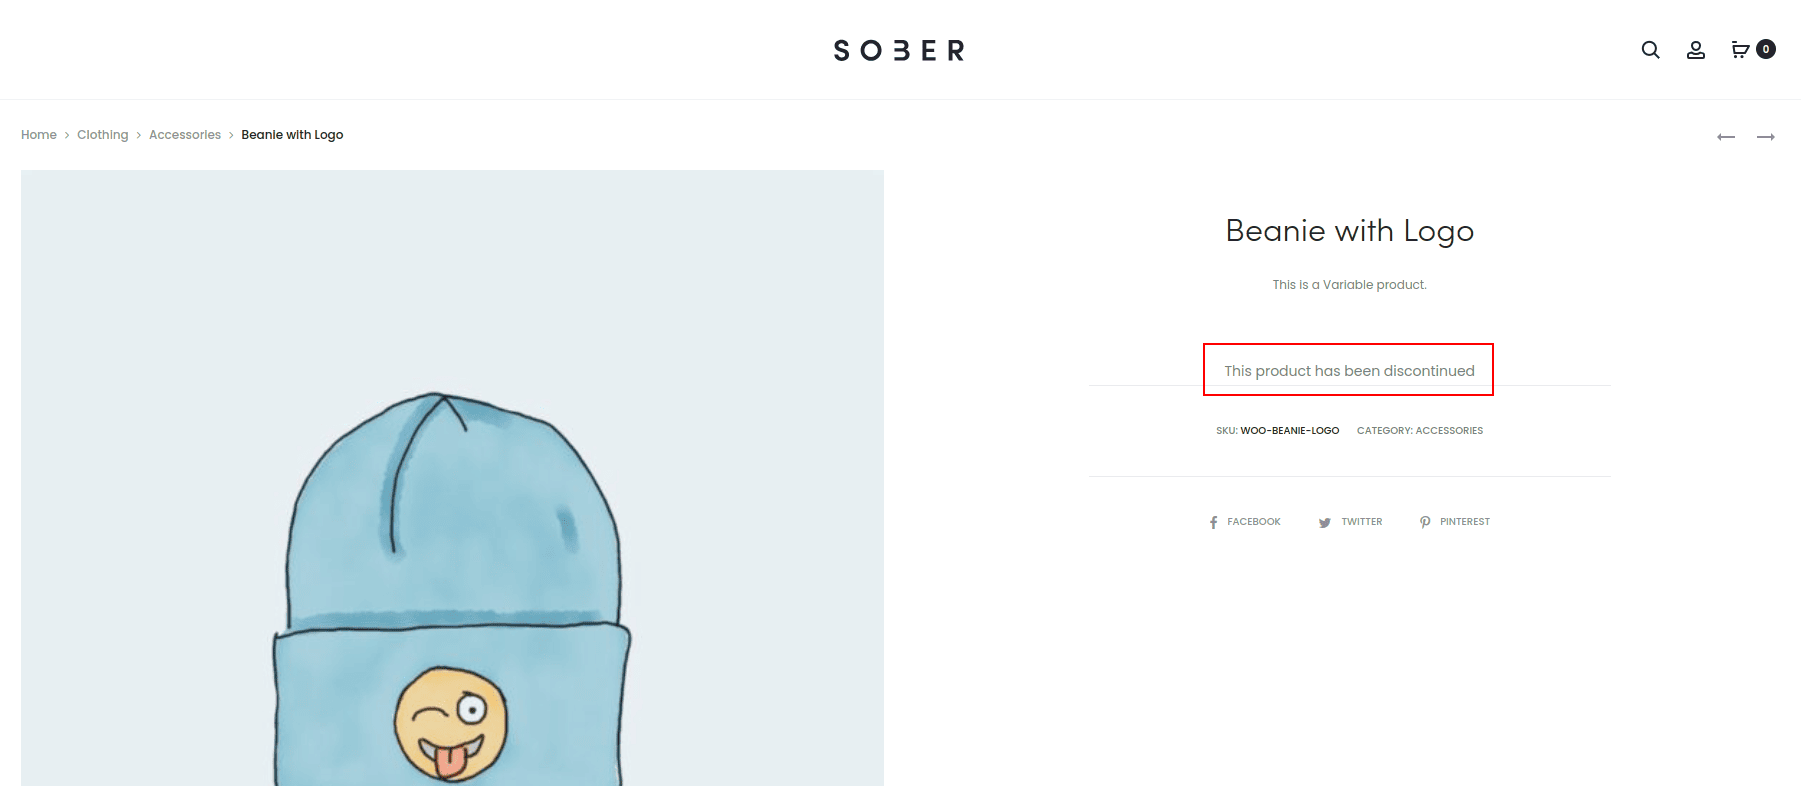
- Open the Product Edit page of that product. Go to the Discontinued Products Tab, where you will find a drop-down for Product Message Type, and select Product Specific Message.
- After selecting Product Specific Message, an editor box will appear where you can set your custom message for that individual product.
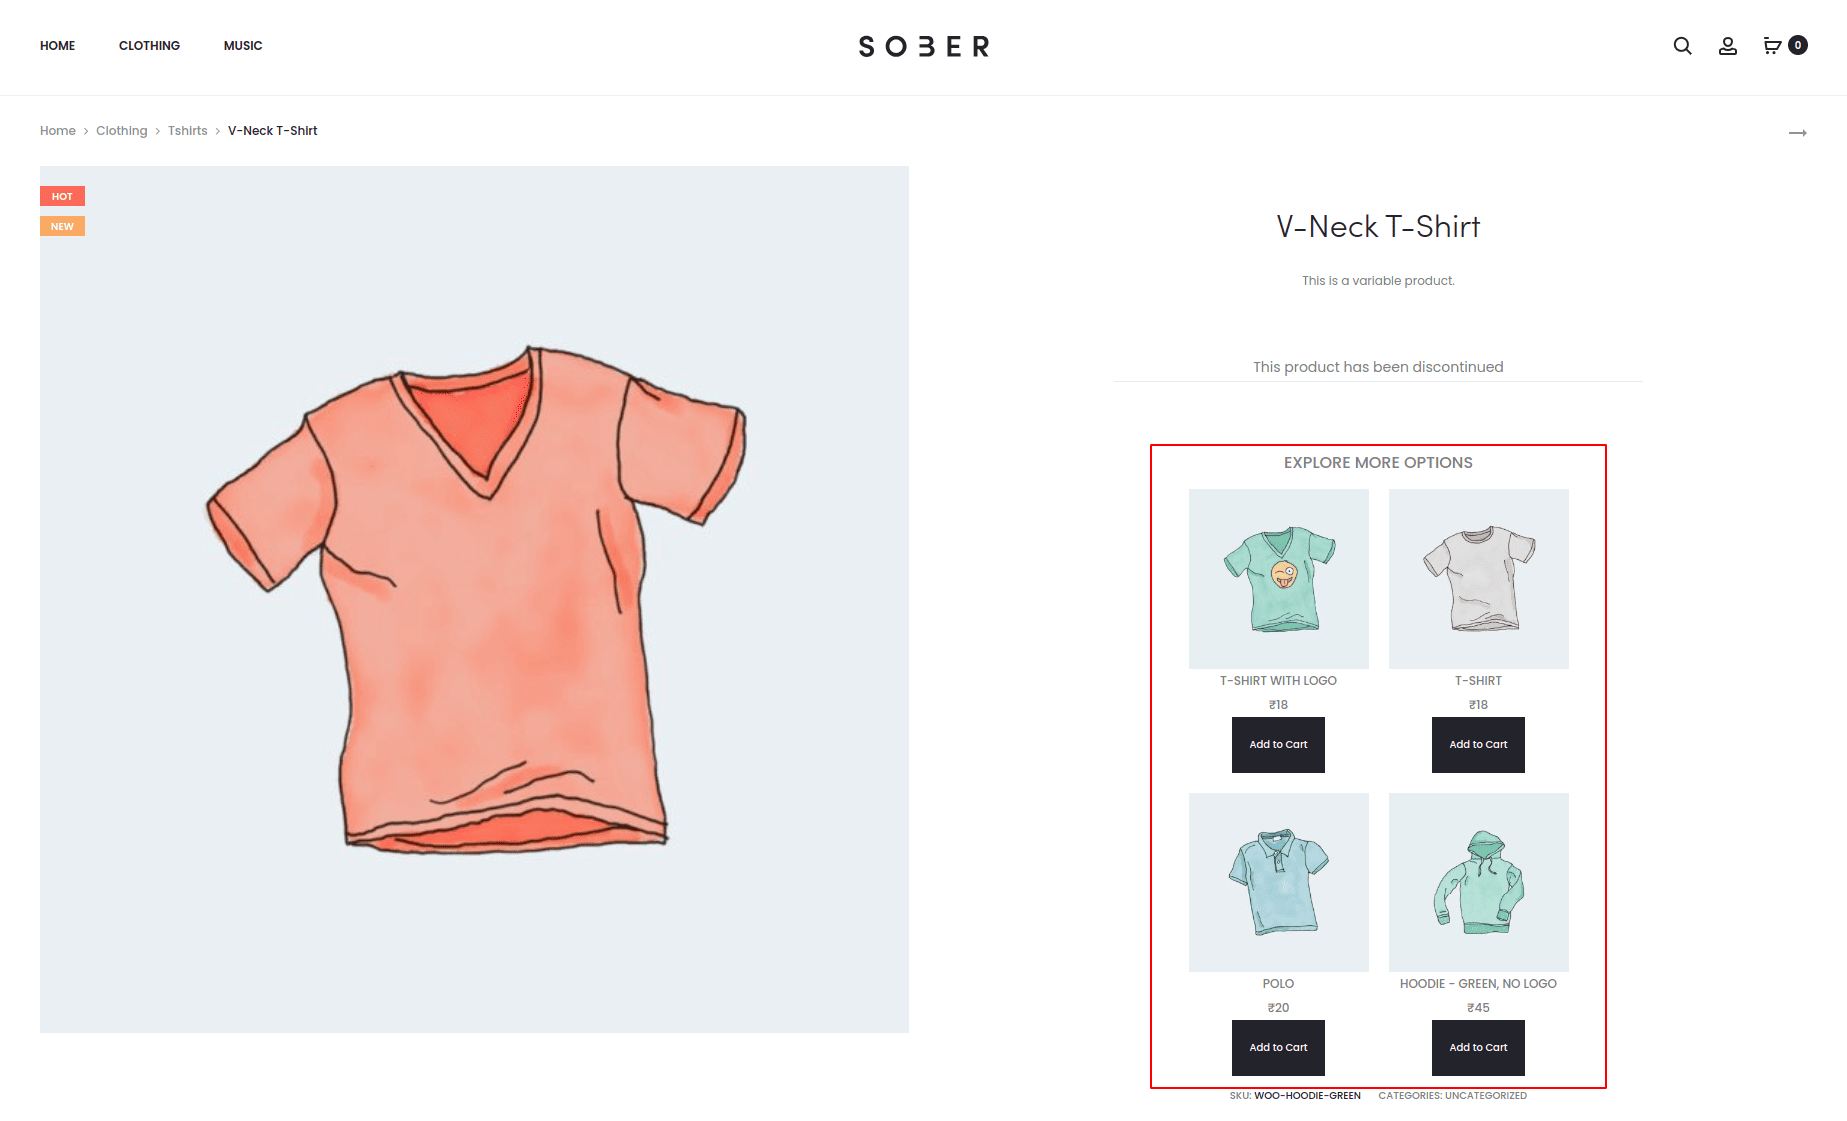
Setting Similar Products for Individual Discontinued Products
- Go to Products > All Products.
- Open the Product Edit page of that product.
- Go to the Discontinued Products Tab from the Product Data meta box.
- Select Add Similar Products checkbox. After selecting the checkbox, two fields will appear.
- Enter the Header Text.
Here you can set a Custom Header for the Individual Products to display Similar products on the Product page of that Discontinued Product. - Select similar Products.
Here you can select up to 4 similar products from the drop-down which will be displayed in the product grid on the Product Page of that Discontinued Product.
- Enter the Header Text.
Setting Shortcode to Display Discontinued Products Message on the Product Page
If your discontinued product message is not displayed on the product page due to template customization or any other builder, please use our shortcode [dpssw_display_discontinued_message] to display the discontinued product message. We have provided an example below of how to implement the shortcode on a product page using the Elementor theme.
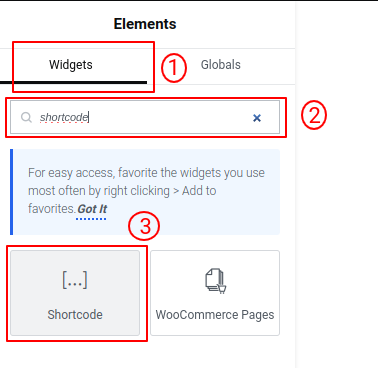
1. In Elementor, open the product page template where you want to add the shortcode. Navigate to the “Widgets” panel on the left-hand side.
2. Search for the “Shortcode” widget in the search bar.
3. Drag and drop the “Shortcode” widget to the desired location on your product page.
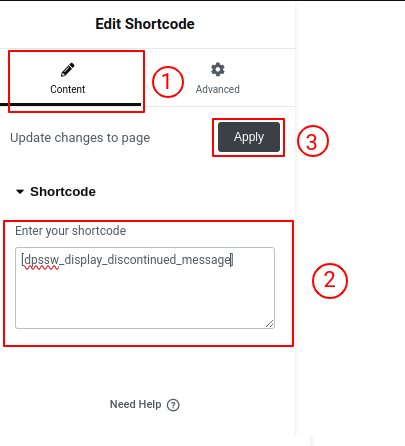
1. Once you’ve added the “Shortcode” widget to your desired location on the product page template, click on the widget to open its settings.
2. In the ‘Content‘ tab of the “Shortcode” widget, you’ll see a field where you can input your shortcode. Paste or type [dpssw_display_discontinued_message] into this field.
3. After adding the shortcode, click ‘Apply‘ (or ‘Update’ if you’re done with all changes) to save your changes and ensure the shortcode is correctly applied to the block.
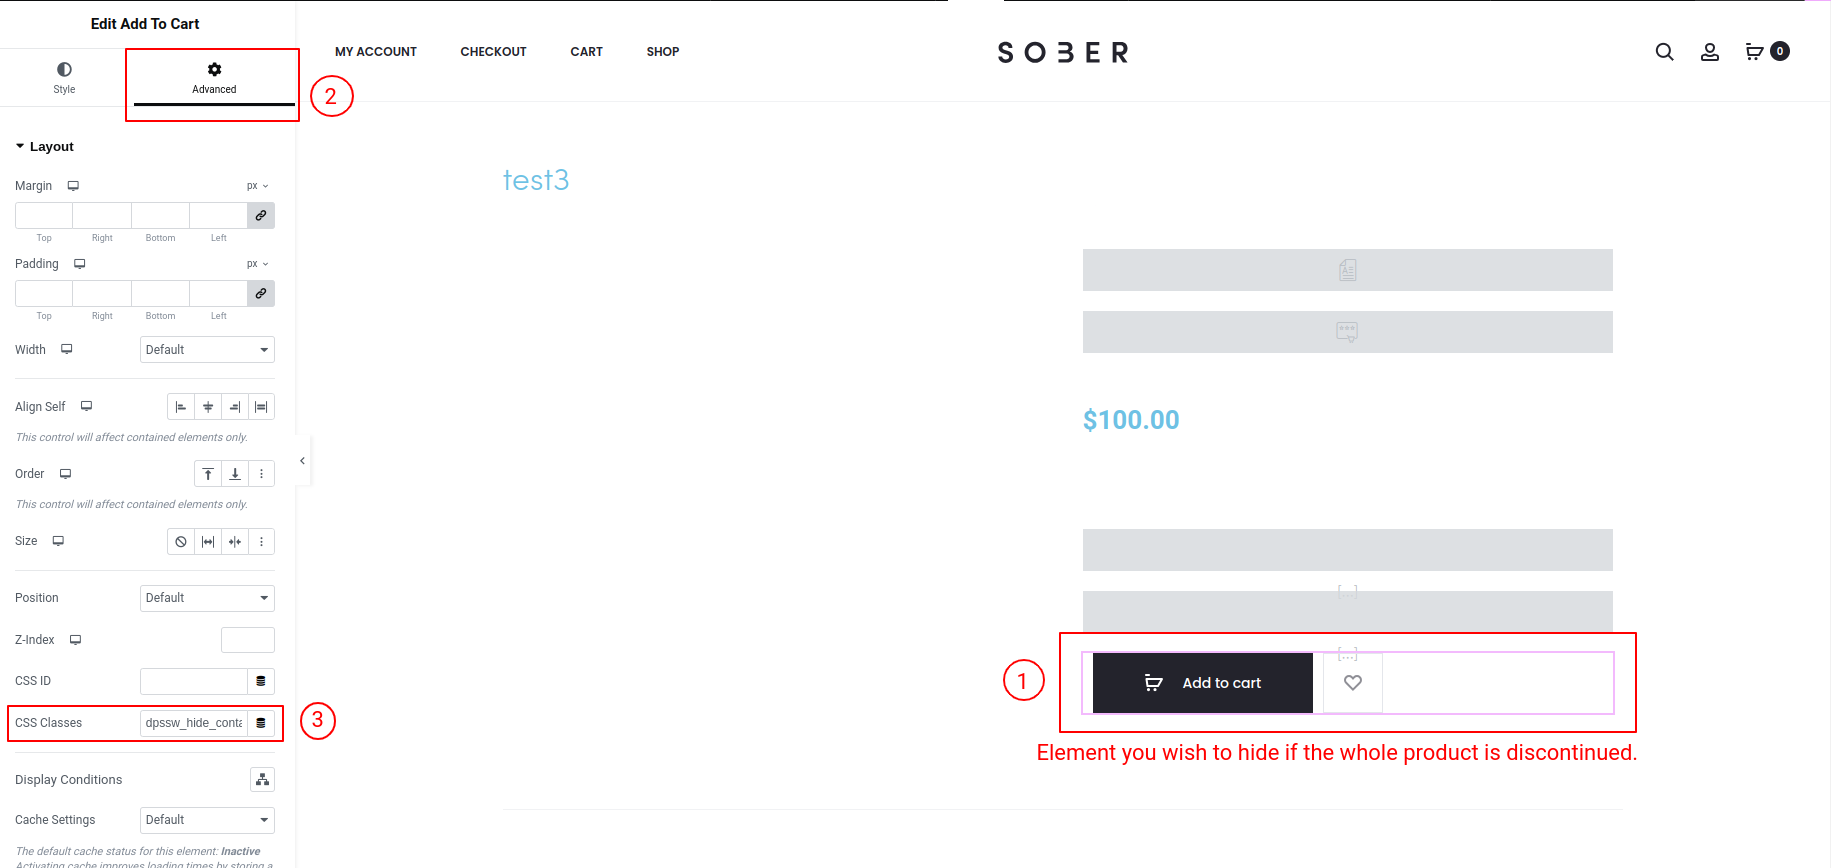
1. Navigate to the product page template in Elementor, and click on the element you want to hide when the discontinued message is displayed.
2. Once the element is selected, go to the ‘Advanced‘ tab in the Elementor panel on the left-hand side.
3. In the ‘Advanced’ tab, locate the ‘CSS Classes‘ field. Enter the custom class ‘dpssw_hide_container‘ into this field.