For WordPress users, one crucial aspect of this upkeep is ensuring your site runs on the latest PHP version. Upgrading PHP not only enhances security but also boosts performance and unlocks compatibility with the newest features and plugins.
Navigating this process may seem daunting at first glance. But fear not! With our comprehensive guide, you’ll breeze through the WordPress PHP upgrade process in just 10 simple steps. Let’s begin!
So Why Should You Update PHP?
Updating your PHP version is crucial for maintaining a high-performing and secure website. Here are the main reasons why you should consider updating your PHP version:
- Performance and Speed: PHP processes data to display your website. Newer PHP versions are more efficient. Thus, they result in faster page load times. Upgrading can improve your site’s speed exponentially!
- Security: Older PHP versions are no longer supported and may have vulnerabilities. Keeping PHP up-to-date makes your website more secure. Cybercriminals mostly exploit outdated PHP versions.
- New Features: Major PHP updates introduce features like new type declarations, improved functionality, and other features. Staying current allows you to benefit from these enhancements.
- WordPress Plugin Development: When you opt to Custom WordPress development services to develop a custom plugin for your site, WordPress plugin developers make sure your developed plugin works with the latest PHP version.
- Compatibility and Support: Running your site on the latest PHP version ensures compatibility with WordPress, themes, and plugins. Plus, hosting providers recommend using the recommended PHP version for optimal performance.
- Better Debugging: Newer PHP versions provide improved error messages and warnings. This makes it easier to identify issues in your code. This helps developers pinpoint the exact problem area and fix it more efficiently.
How can I find the PHP version of my WordPress site?
There are multiple ways to check your current PHP version. Let’s talk about them.
Check Through Your WordPress Dashboard
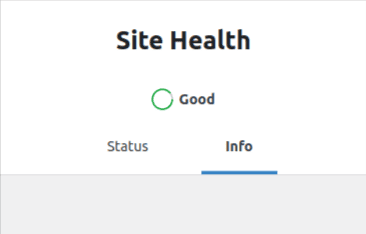
First log into your WordPress Dashboard. Go to the Tools menu and then select Site Health.
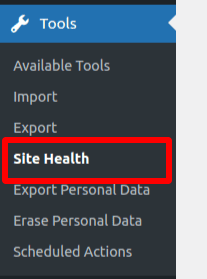
You will then see 2 options below your site’s health status. Here, click on Info.
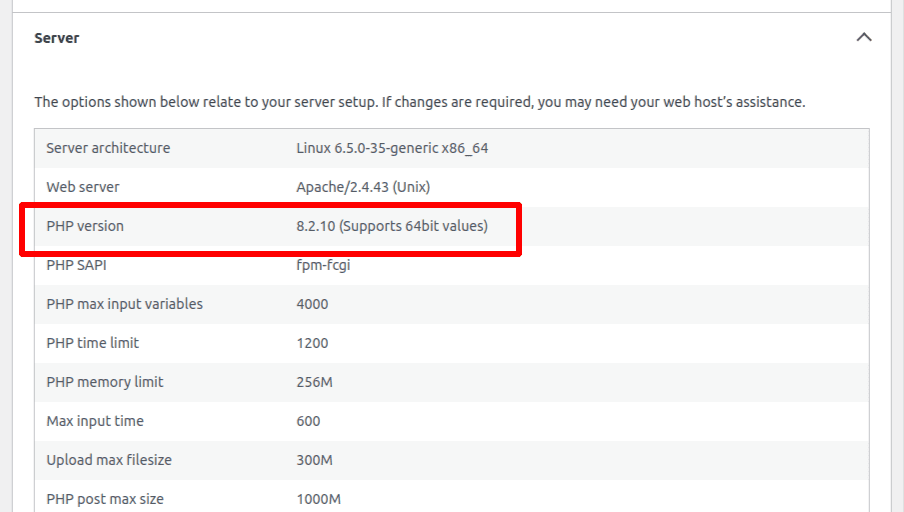
From the list, you need to open the Server menu.
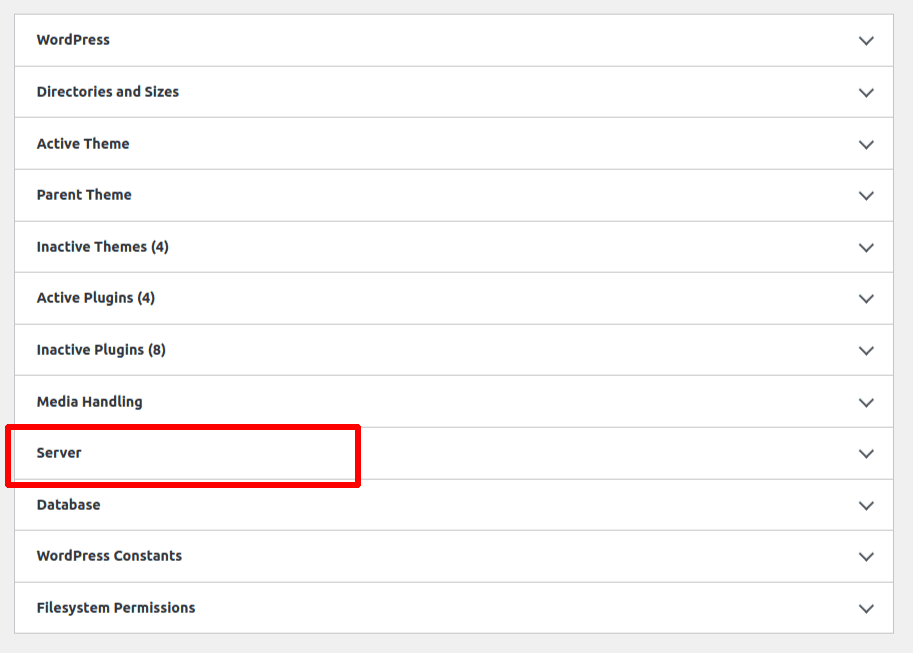
Make sure to expand it, and you’ll find your WordPress’s current PHP version.
Use the Display PHP Version WordPress plug-in
Now, here is the other way to check your PHP version. You can use a plugin that checks the PHP version. Go to your Plugins section and search for “Display PHP Version”.
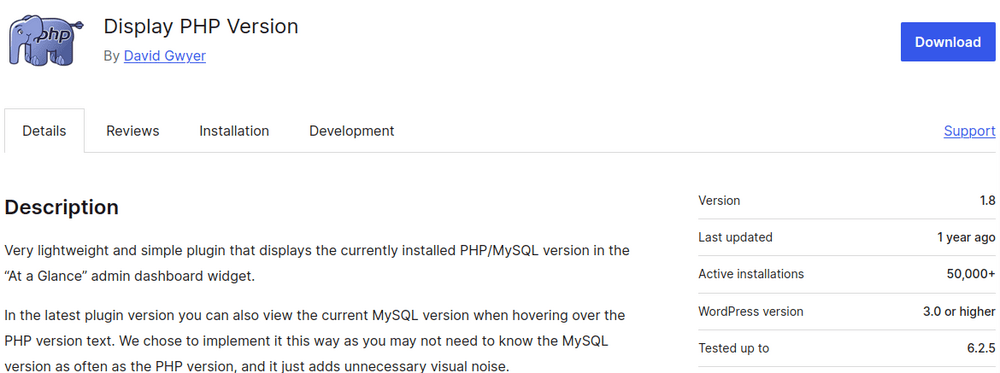
It is easy to just download and activate the plugin.
Pro-Tip
Upgrade WordPress PHP version in a ordered fashion i.e PHP 7 to PHP 7.1, then to PHP 7.2 and so on. Rather than jumping from PHP 7 to PHP 8.
If you find it confusing, consult a professional WordPress plugin developer.
Contacting Your Hosting Provider
If you are using a managed hosting, contact your hosting provider. Usually you get a dashboard from the hosting provider. But if you don’t have one, you can just contact them and ask the php version.
How to Upgrade WordPress PHP Version
In the previous steps we saw how you can check php version through multiple ways. So, now we will see how you can upgrade your PHP version. What steps do you need to follow?
- Backup Your Website: First create a full backup of your website before making any changes. This includes files, databases, and any custom configurations. In case anything goes wrong during the upgrade, you can easily restore your site to its previous state.
Or what you can do is set up a staging environment and test the WordPress PHP upgrade on the site’s clone. This way your site will remain safe incase of any issues. - Check Compatibility: Next, ensure that your plugins and custom code are compatible with the targeted PHP version. Some older plugins may not work correctly with newer PHP releases. Make sure to update or replace any incompatible components to avoid potential issues.
- Review Custom Code: Examine any custom PHP code you’ve written for your website. Make sure it follows the best practices and is compatible with the target PHP version. Make necessary adjustments to the code segments that might cause issues.
- Update WordPress and Plugins: Make sure your WordPress core ,plugins and themes are up to date. WordPress developers usually release updates to improve compatibility with newer PHP versions. To reduce conflicts, it is important to keep everything updated.
- Test Locally: Now, upgrade your PHP version. Visit the official PHP site and explore the PHP version you want to download. Once you do it, test your website to see how its performing.
You can set up a local development environment. Use tools like XAMPP or Docker to test your website with the upgraded PHP version. This allows you to pinpoint and rectify any compatibility or performance issues prior to implementing the changes on your live site. - Update Dependencies: Other than WordPress plugins and themes, check if your server-side dependencies such as database drivers, caching systems, and libraries are compatible with the new PHP version. You’ll need to update or replace them to maintain smooth functionality.
- Monitor Performance: After upgrading your PHP version, keep an eye on your website’s performance. This is important to note. Check for any unexpected errors, slow loading times, or memory usage spikes. Adjust settings or optimize code as needed.
Looking to Upgrade your PHP Version but dont know how?
Reach Out Immediately!Conclusion
Summarizing it all, upgrading your PHP version is critical for maintaining a secure and high-performing website. It matters a lot because older PHP versions expose your site to cyber threats. And by upgrading it, you enhance your defences and protect sensitive data.
When a new version of PHP is released, it offers internal improvements. This results in faster loading times and better resource utilization. It prevents compatibility issues and keeps your site running smoothly. Your website will run more efficiently.